Sharing design styles - Exercise
Task 1: Reference a style from another drawing or template
- Continue in the previous drawing. If you did not complete the previous Try It, browse to the C:\Autodesk Learning\Setup C3D Projects\Course 2 - Drawing Templates - Styles folder and open Try- it-2C.dwg.
- In the Toolspace>Settings tab, expand Surface>Surface Styles and note that only the Standard style is available.
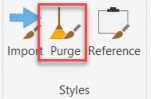
- In the Manage tab>Styles panel, click Reference.
- In the Attach Referenced Template dialog box, click the green plus icon (Attach a new template).
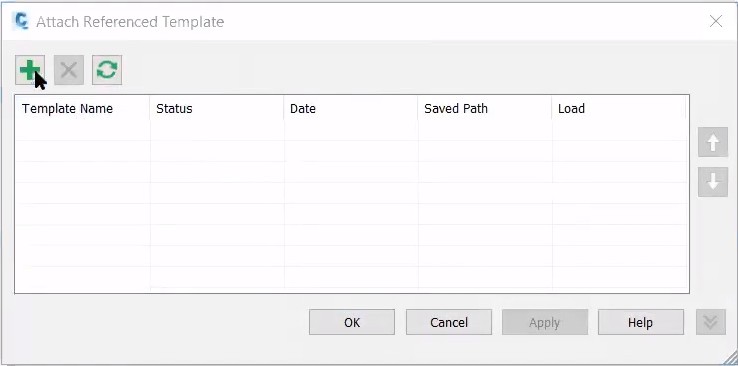
- In the Open Template File dialog box, browse to the C:\Autodesk Learning\Setup C3D Projects\References\Drawings folder and select Sample_styles.dwg. This drawing contains the styles to be referenced.
- Click OK.
- Once the file has loaded in the Attach Referenced Template dialog box, select which style(s) you want to reference using the Styles tab in the bottom left-hand pane.
- First click the green checkmark toggle to deselect everything. The icon changes to a green dot.
- Click on the Surface collection and a green checkmark appears. You are selecting all the surface styles and label styles.
- Click OK.
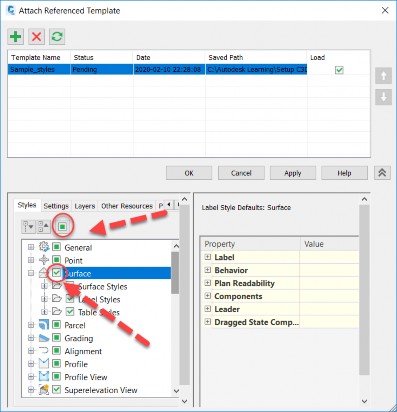
- The referenced styles will now display in the Toolspace>Settings tab under the Surface Styles node with the blue paperclip icon. This is the symbol designating these styles as being referenced.

- Save the drawing, but do not close it.
Task 2: Synchronize referenced styles
If a change is made to the original file, the referenced styles will need to be synchronized. The following steps will demonstrate this.
- Open C:\Autodesk Learning\Setup C3D Projects\References\Drawings\Sample_styles.dwg.
- Save the drawing. Even though no changes have been made, the timestamp of the drawing is now more recent than when it was referenced earlier.
- Close the drawing.
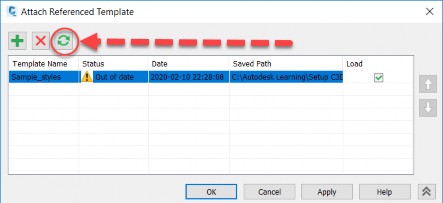
- Return to the Try-it-2(A or C).dwg drawing. In the Manage tab>Styles panel, click Reference. In the Attached Referenced Template dialog box, note that the Status column for the Sample_styles template displays an Out of date warning. Click the green Synchronize icon to update the reference.
- Save the drawing.
Task 3: Drag and drop styles
- Continue in the previous drawing. If you did not complete the previous Try It, browse to the C:\Autodesk Learning\Setup C3D Projects\Course 2 - Drawing Templates - Styles folder and open Try- it-2D.dwg.
- Open C:\Autodesk Learning\Setup C3D Projects\References\Drawings\Sample_styles.dwg and ensure it is the current drawing.
- You need to purge the unused styles from the Try-it-2 drawing in order to demonstrate how to drag and drop styles.
- In the Manage tab>Styles panel, click Purge.
- Note in the lower-left corner that over 390 styles can be purged. These are styles not being used in the drawing. Click OK to proceed with the purge.

- In the Toolspace>Settings tab, select Master View from the drop-down list.
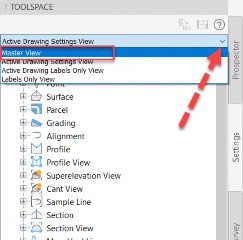
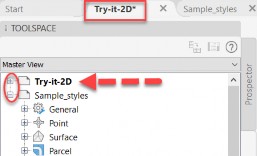
- Click on the minus (-) next to Try-it-2 to collapse the branch, then click on the plus (+) next to Sample_Styles to expand the branch. The drawing that is bolded (Try-it-2) designates that it is the current drawing.
- Expand the Parcel>Parcel Styles node in the Sample_styles collection. Select the Parent Parcel style.
- Click on the Parent Parcel style again and hold down the left mouse button, then drag it into the drawing area. A small icon with a plus (+) symbol appears at the cross hairs. Release the mouse button.
- The Parent Parcel style has now been added to the Try-it-2 drawing.
- Under Sample_styles, select the Residential parcel style.
- Click on the Residential parcel style again and hold down the left mouse button, then drag it into the drawing area. A small icon with a plus (+) symbol appears at the cross hairs. Release the mouse button.
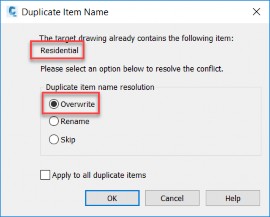
- The Duplicate Item Name dialog box appears, letting you know that there is already a Residential style in the current drawing. Select the Overwrite option to resolve the issue and click OK.
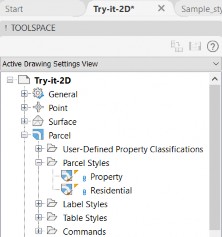
- In the Toolspace>Settings tab, select Active Drawing Settings View from the drop-down list. Expand the Parcel>Parcel Styles node and note that the imported styles now appear for the active drawing.
- Save and close both drawings.


