 Matt Alderton
Knowing how to build a hydraulic model means following a repeatable process, from defining the question to interpreting the results. Here are the nine steps, plus the common mistakes that undermine a model’s reliability.
Hydraulic models use computer software and mathematical equations to simulate the movement of water through natural and built environments. The process of creating them starts with determining a central modeling question. From there, it involves collecting information, capturing real-world conditions, assigning parameters and boundary conditions, calibrating and validating the model, testing the model, and, finally, interpreting the model’s results.
When you know how to build a hydraulic model from start to finish – from data gathering to decision making – you can use hydraulic modeling to test important metrics like water pressure, velocity, flow rates, and water levels in proposed systems or during potential scenarios.
If you’ve ever spilled a beverage, accidentally overfilled a bathtub, or watched the reckless spray of a wayward garden hose, you know that water can be wild. What initially seems unpredictable and unconstrained, however, in reality is the opposite: With the right knowledge and the proper tools, water can be as formulaic as it is wet.
One of the most powerful tools for understanding (and controlling) water is hydraulic modeling, which is the practice of simulating how water moves through natural and built spaces. With the right hydraulic models at their disposal, engineers can foresee catastrophic flooding, design infrastructure that’s more functional and resilient, and plan for an uncertain future in ways that balance risks with opportunities.
At the heart of hydraulic modeling are fundamental physics equations for mass, momentum, and energy conservation; complex mathematical formulas for simulating water movement in pipes, channels, and networks; and sophisticated hydraulic modeling software applications like InfoWorks ICM, InfoWorks WS Pro, InfoWater Pro, and InfoDrainage. The skeleton on which all that hangs, however, is the hydraulic modeling process itself – the basic framework and steps you must take to create a hydraulic model.
The process for building a hydraulic model begins with a practical engineering question and ends with reliable intelligence that informs real-world design choices and business decisions. In between are crucial steps for gathering, organizing, and calibrating models. When you follow the process completely and consistently, the outcome isn’t a crystal ball that makes perfect predictions, but rather a credible compass that can point designs in the right direction to achieve project goals.
1. Define the question
The first step in creating a hydraulic model is to determine what question the model should help answer. A municipality, for example, might want to know how stormwater systems will perform during extreme weather. A water utility, on the other hand, might want to check whether residents living in a new housing development will have adequate water pressure during peak usage periods.
Simply put: If a hydraulic model is the means to a specific end, then you must decide what that end is. This requires defining what operational challenge the model will address; identifying the intended output, such as flow, pressure, water levels, flood extent, or pipe capacity; establishing a scope, such as geographic area or time period; and determining project phase or audience, which can dictate how much detail, accuracy, and assurance are required.
2. Choose a modeling approach
Once you’ve defined the model’s purpose, you must think through important design considerations, including what physical processes the model should represent, such as pressurized pipe flow, gravity drainage, and surface-water movement; boundaries, including where the modeled system begins and ends; and scenarios the model should account for, such as peak demand, altered river conditions, pump failure, or extreme weather.
At this stage, perhaps the most important decision is what modeling approach to use. A steady-state approach is best when represented conditions are constant for the purposes of your specific design question, while an unsteady approach is best when you want to model hydraulic conditions that change over time.
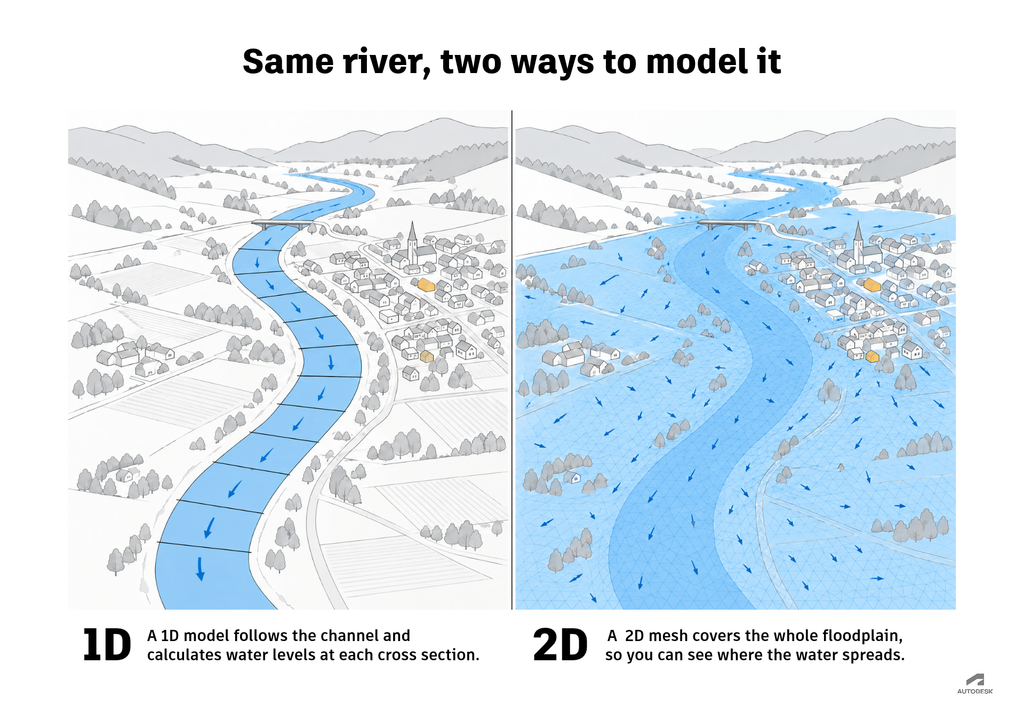
Model dimensions are equally key. There’s 1D modeling, for representing flow along a defined path; 2D modeling, for representing flow across a surface or area; and 3D modeling, for representing flow in all three spatial dimensions, including vertical movement. 3D models are usually reserved for detailed local studies where vertical flow matters, such as flow around bridge piers, through complex hydraulic structures, or in estuaries where layers of salt and fresh water behave differently. Most network and flood models use 1D, 2D, or a combination of the two.
3. Assemble data
A hydraulic model built using unreliable information will deliver unreliable results. Collecting high-quality data is therefore a critical step. Although perfect data is never available for every part of the system, it’s vital to understand what’s known, what’s approximate, and what’s still undetermined.
Among the potential data sources from which to mine data are engineering drawings, asset inventories, and GIS databases; survey data, digital elevation models, and topographic maps; weather records, land-use datasets, and field inspections; and instruments like flow meters, pressure sensors, and river gauges. Useful information to extract might include physical system data, like pipe locations, lengths, diameters, materials, slopes, and elevations; operating data, such as water demand, pump schedules, reservoir levels, rainfall, and water levels; environmental data, like land use, soil properties, impervious surfaces, and catchment boundaries; and observational data, including field measurements like flow, pressure, and flood extent.
In software such as InfoWorks ICM, network data is often imported directly from GIS, and terrain data becomes the basis for a 2D mesh. Those imports are where many data errors first enter a model, so checking data before import saves time later.
4. Capture the physical system
Hydraulic modeling is a marriage between mapping and mathematics. The accuracy of the math depends on the quality of the map. It’s therefore important to create a reliable representation of the physical system for which your model is intended. This requires capturing tangible elements like pipes, pumps, valves, and channels; defining flow paths correctly; and representing the relevant physics, including conservation of mass and momentum.
Although accuracy is paramount, a model that’s too intricate can be prohibitively time-consuming and resource-intensive to build and maintain; may create computational bottlenecks that render the model too slow to be useful; and can unintentionally obscure “signal” with “noise,” making it difficult to discern what the model is telling you. For that reason, you must strike the right balance between too much detail and too little by preserving only the features of a system that are relevant to the model’s central modeling question. In other words, you should strive to create the simplest model that can reliably answer your question.
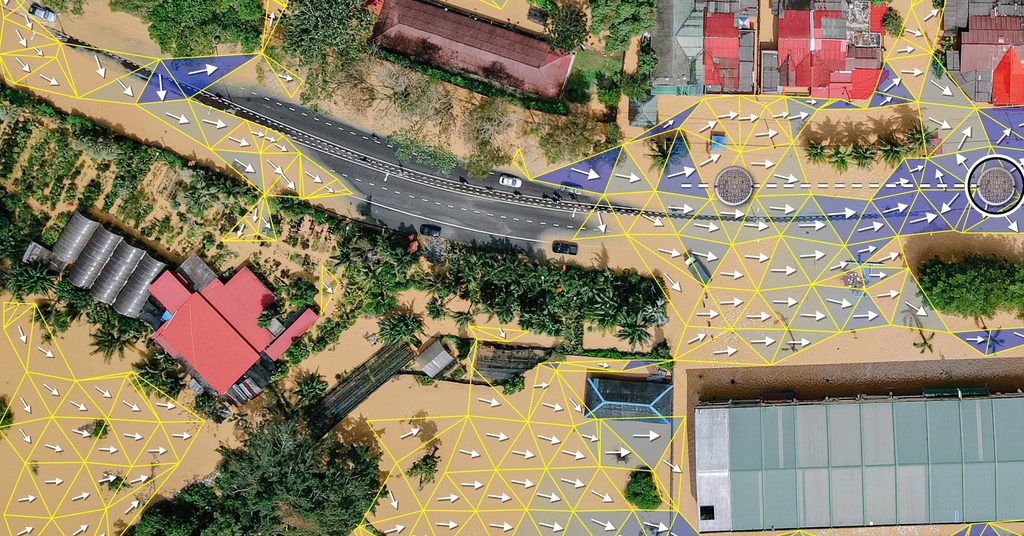
Here’s an example: If an engineer is evaluating a stormwater drainage network for flooding, their model will need to include stormwater catchments that may contain thousands of surfaces, drains, and terrain variations. A simplified model avoids capturing every detail and instead groups areas into sub-catchments that have similar properties, thereby preserving features that are relevant to flooding while keeping the model manageable.
5. Assign parameters and conditions
In hydraulic modeling, parameters are the physical characteristics of the modeled system or its various components while initial conditions are the starting state for a simulation. Boundary conditions, on the other hand, are the conditions imposed at the model’s edges to constrain how the modeled system interacts with its surroundings. All three – parameters, initial conditions, and boundary conditions – are critical to producing trusted results.
Consider an engineer who’s modeling a river reach: Channel and floodplain roughness are key parameters; water levels at the start of a simulation are initial conditions; and downstream normal depth and upstream flood hydrograph are boundary conditions. Adjusting any of these inputs will change the model’s output, like the dimmer switch on a lamp changes the brightness in a room.
6. Run the model
Once you’ve captured the physical system and defined your inputs, you’re ready to configure the model and run it. This requires specifying the scenario, such as a rainfall event or demand pattern; setting the simulation period and temporal resolution, which is the frequency of calculations like water level, flow velocity, and discharge; and choosing numerical settings based on the equations and conditions that you’re modeling.
When you eventually run the model, your modeling software will make the desired calculations based on the data, parameters, and conditions you’ve given it. If the model returns warnings or errors – for example, about disconnected components, inconsistent data, or unsuitable numerical settings – investigate them and act appropriately to resolve them. In InfoWorks ICM, you can run a network validation check before you run the model. Don’t confuse it with the model validation in step 7, which tests the model’s results against independent field data.
If you don’t encounter any errors, that doesn’t mean your work is done. After all, a completed run does not necessarily mean your model is producing reliable results. After you run the model, you’ll therefore need to check calculations for physical plausibility to make sure you trust the model’s output.
7. Calibrate, validate, and test sensitivity
Graduating from having a model that runs to having a model that produces reasonable results for the task at hand requires calibration and validation. Calibration asks, “Do the model’s outputs align with real-world observations?” To ensure that they do, you’ll need to collect field measurements like pressures, flow rates, or water levels and compare them with simulated results. If they don’t align, you should adjust uncertain parameters, such as pipe roughness, within realistic ranges until they do.
Validation asks an entirely different question: “Does the model perform well on data it wasn’t calibrated to?” In other words, you don’t just want to know whether the model can reproduce real-world conditions; you also want to know whether it can predict them. This requires testing the calibrated model against an independent set of field data. If you’ve created a stormwater model, for example, you might calibrate the model using one or more storm events, then validate it using separate storms with different rainfall patterns and intensities.
Neither calibration nor validation proves that a model is infallible. Together, however, they provide evidence that the model can be trusted for specific purposes and under certain conditions.
Sensitivity testing rounds out this step. By systematically changing uncertain inputs within plausible ranges, such as pipe roughness, soil infiltration, rainfall intensity, or downstream water levels, you can see which ones have the biggest effect on results. If flood depths change dramatically when you adjust channel roughness, for example, that input needs better data or a more cautious design margin. If they barely change, you can spend less effort refining it.
8. Test scenarios
Once you trust the model, you can use it for what it was built to do: testing scenarios. These are the conditions you identified in step 2, such as an extreme storm, projected population growth, or a pump failure. Comparing scenarios side by side shows how the system performs under each one and which design options hold up best.
📚 See how Jacobs used 1D and 2D scenario modeling to control stormwater in Toronto.
9. Interpret the results
Hydraulic modeling is an iterative process. Even after you’ve created, calibrated, validated, and tested a model, your work continues in the form of fine-tuning and finessing. The time eventually comes, however, when a project must move forward with decisions that are grounded in your interpretation of the model’s results.
Interpreting results means going back to the question you defined in step 1. Will residents in the new development have adequate pressure at peak demand? Where will flooding occur, and how deep will it get? Read results alongside their uncertainty: if sensitivity testing showed that an input strongly affects the outcome, consider presenting a range rather than a single number. And be clear about what the model can’t tell you, such as conditions outside the range it was calibrated for.
📚 Scottish Water shows what this looks like at scale.
Common model-building mistakes
- Starting without a clear goal: Make sure at the outset that you’ve defined the engineering question you need to answer, as well as intended outputs and decision criteria.
- Trusting data without verifying it: Unless you check, reconcile, and document inputs at the front end, you won’t be able to trust your model’s predictions on the back end.
- Overcomplicating the model: Because too much detail can complicate the picture and slow your model down, keep the model as simple as your question allows.
- Assigning unrealistic parameters or conditions: Using correct measurements and defensible estimates is key, as is recognizing and documenting uncertainty wherever it exists.
- Accepting results prematurely: Just because your model completes a run doesn’t mean it’s correct or credible. Before you trust results, check their physical plausibility, then repeatedly perform calibration, validation, and sensitivity testing until you feel assured of the model’s outputs. Along the way, document expectations, adjustments, and versions for other team members so they share your faith in the model.
Remember: The goal of the hydraulic modeling process isn’t perfection. Rather, it’s confidence. A model will never be correct every time or for every scenario. In fact, a model is theoretically never correct – period. But when you follow every step of the hydraulic modeling process carefully and completely, you can rest easy knowing that the engineering decisions you make based on a model are grounded in evidence instead of assumptions.
Related reading
- Hydraulic modeling explained: a guide to 1D, 2D and integrated catchment modeling: Go deeper on how 1D, 2D, and integrated models fit the workflow you just learned.
- 1D vs. 2D hydraulic modeling: how to choose for floods, dams, culverts and open channels: Choose the right dimensions for your model, the key decision in step 2.
- Continuity equation explained: Revisit the conservation of mass behind every hydraulic model.
- From Civil 3D to preliminary stormwater design: 5 InfoDrainage workflows: See the process applied to a stormwater design, from pipe network to sized, reported design.