Elevate your design and manufacturing processes with Autodesk Fusion
I know what you are thinking. Extrude? What can I learn about the ol’ simple extrude command?
Well, let me tell you. The Fusion 360 extrude tool can be used 100 different ways. If you are using it to just extrude a box, well you are missing out. In this quick tip, we are going to cover different start conditions, extent options, and bodies to cut.

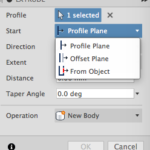
Let’s start with the start of the extrude. By default, the extrude will start from the sketch plane from the profile that is selected. If you want to become a LEVEL 70 Fusion 360 wizard, change this to “Offset Plane” or “From Object.” The “Offset Plane” will allow you to specify a distance from the sketch plane to start the extrude. I’ll use this when I accidentally start my sketch on the wrong face. The “From Object” will allow you to select a construction plane, face, point, etc. to drive where the extrude will start. Take it to the next level and play around with the offset distance from the selected object. The “From Object” works perfectly with curved or non-planar surfaces too.
 Next, let’s move on to the end conditions. This is the bread and butter to making your designs parametric. I’ll use the “To Object” or “All” option to ensure my extrudes go to the correct distance even if design changes occur.
Finally, let’s end on the objects to cut option. In Top-Down Assembly design there are often times you ant to align several components to ensure they fit together. Unfortunately, there are times that an extruded cut is required but there are bodies or components in the way of a cut extrude. This list ensures that you can still perform the cut with out cutting the geometry that requires to stay whole.
Watch this video to see all of this in action: