Autodesk Fusion offers powerful tools for optimizing every detail of your 3D printing workflow, and its Fused Filament Fabrication (FFF) print settings are no exception. With hundreds of adjustable parameters designed to support a wide range of printers, materials, and performance goals, Fusion gives users complete control over print quality, strength, and speed. This article provides an overview of key FFF print settings—what they do, how they affect your prints, and where to find more detailed guidance within Fusion.
Table of Contents
- What are print settings?
- Priming
- Print bed adhesion
- Infill
- Bridging
- Support structures
- Speed control
- Dual extrusion
- Special features
- What does each print setting do?
What are print settings?
A print setting is a set of options that determines how you 3D print a part. In Fusion, our Fused Filament Fabrication (FFF) print settings contain over 100 settings, allowing you full printing control. We also provide a variety of unique print settings to cover a range of different 3D printer setups. These can be broken down by material, extrusion type, and high-speed printing capabilities, ensuring you can find the optimal configuration for your specific needs. Our print settings have been tailored to work for a whole variety of printers, and we recommend that users optimize them for their printer and setup.
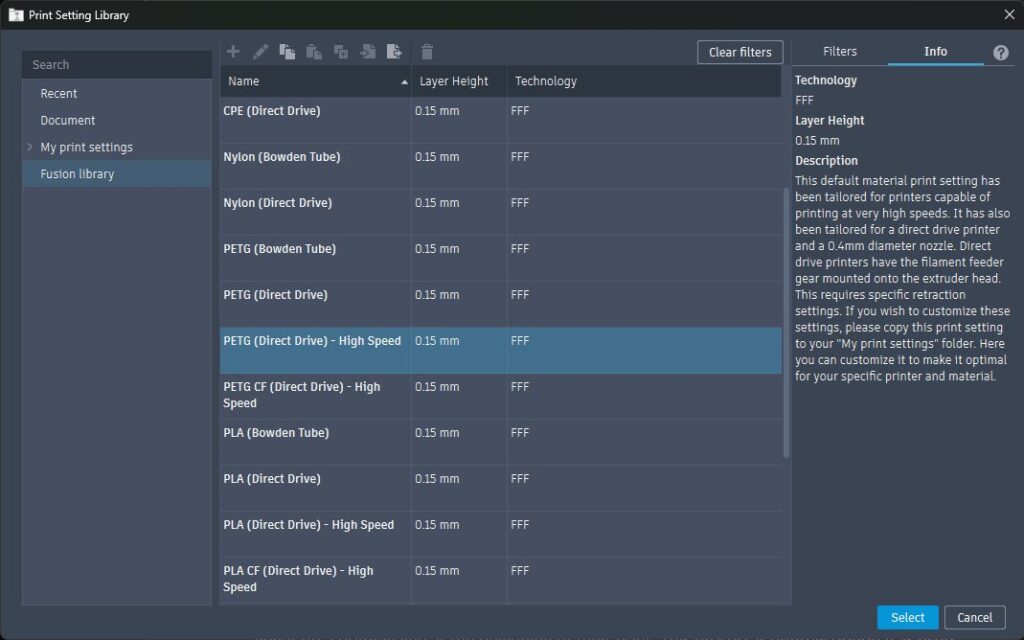
Fusion supports a wide array of materials, including ABS, CPE, Nylon, PETG, PLA, PLA carbon fiber, TPU, PVA, and some metal based filament. We also have specific print settings for direct drive and Bowden tube printers. For those unfamiliar, direct drive printers house the filament gear within the print head, while Bowden tube printers separate the filament gear from the print head and use a Bowden tube to guide the filament. Additionally, for high-speed printing, we include settings to accommodate printers such as the Bambu Lab series. These print settings contain “–high speed” in their name.
For a deeper dive into Fusion’s print settings and how they work, you can read through this help page on the Fusion print settings. Now, let’s move on to a few types of print settings that Fusion offers.
Priming
Priming ensures that your nozzle is ready for action. Fusion allows users the flexibility to generate a priming line at the beginning of their print. The prime line is generated at the front of the print bed, with users having control of its length and distance from the edge of the print bed. Note, the prime line is entirely optional as users can alternatively utilize the print bed adhesion options like skirts to achieve similar results.
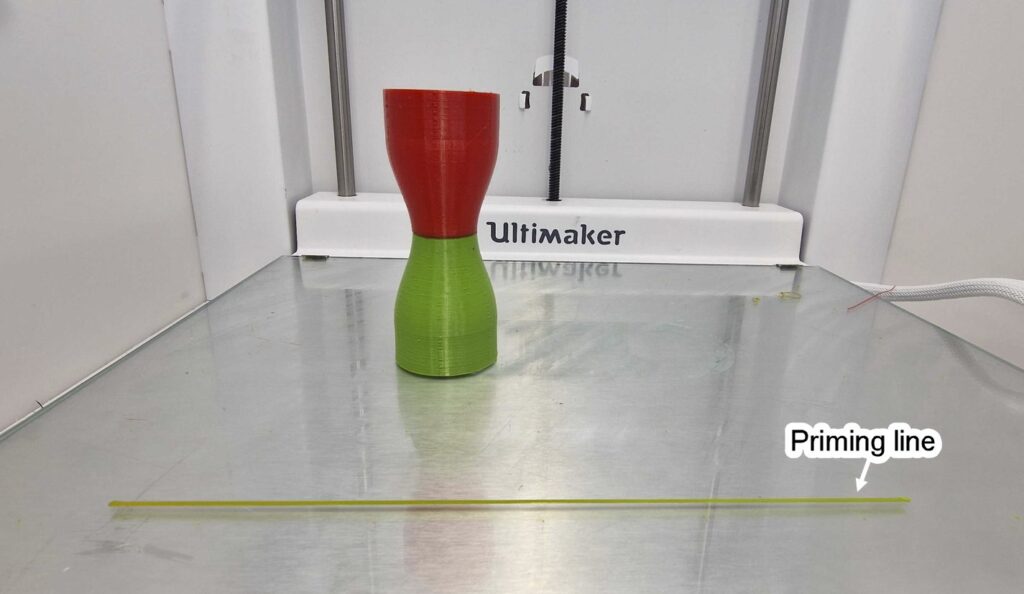
Related print settings: Nozzle Priming, Prime Extrusion Width (mm), Prime Edge Clearance Distance (mm), Prime Maximum Length (mm), and many more.
Print bed adhesion
Proper adhesion to the print bed is crucial, and Fusion offers a selection of adhesion options including skirts, brims, and rafts. These methods aid in improving the part’s ability to stick to the print bed, enhancing the overall print quality and consistency. A brim adds printed loops around the part to increase the surface area in contact with the print bed. Users are able to choose as many or little loops as they want. A skirt is very similar to a brim, except that it is detached from the part and acts as a nozzle priming operation. A raft is when multiple layers of filament is deposited down before the part to provide a platform on the print bed for the part to be printed onto. This can simply be removed by hand once printing has finished.
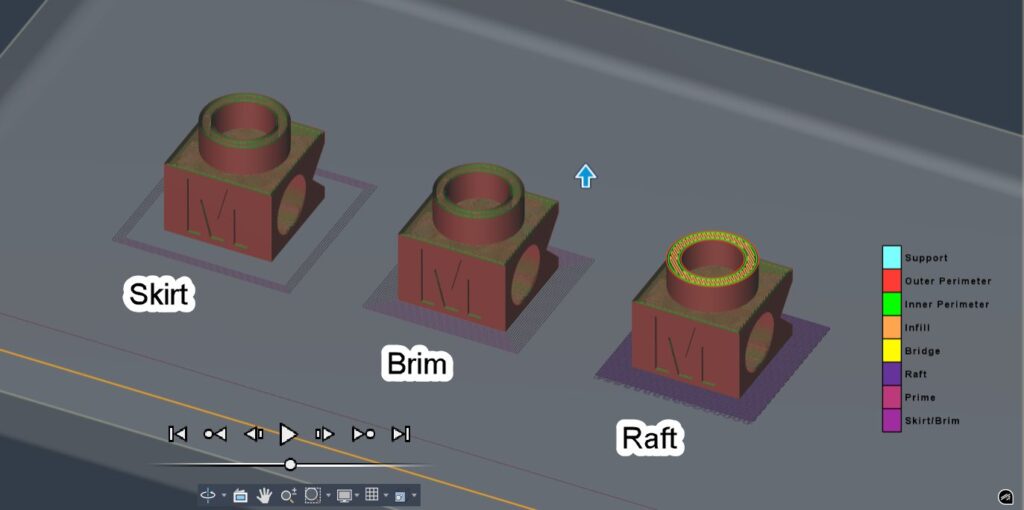
Related print settings: Print Bed Adhesion Type, Number of Layers Fan Disabled, and many more.
Infill
Fusion provides a variety of infill settings and patterns to suit your project needs. From standard grid to complex gyroid patterns, we cover it all. Users also have the ability to change the infill percentage of their chosen infill pattern. A denser infill percentage produces a stronger part but uses more material and increases the printing time. We recommend an infill percentage of around 20-30 for most prints.
For a comprehensive guide, check out our dedicated video showcasing the different infill patterns and learn how to embark on your very own Fusion infill project. This project is conveniently pre-created for you in the Fusion CAM Samples folder.
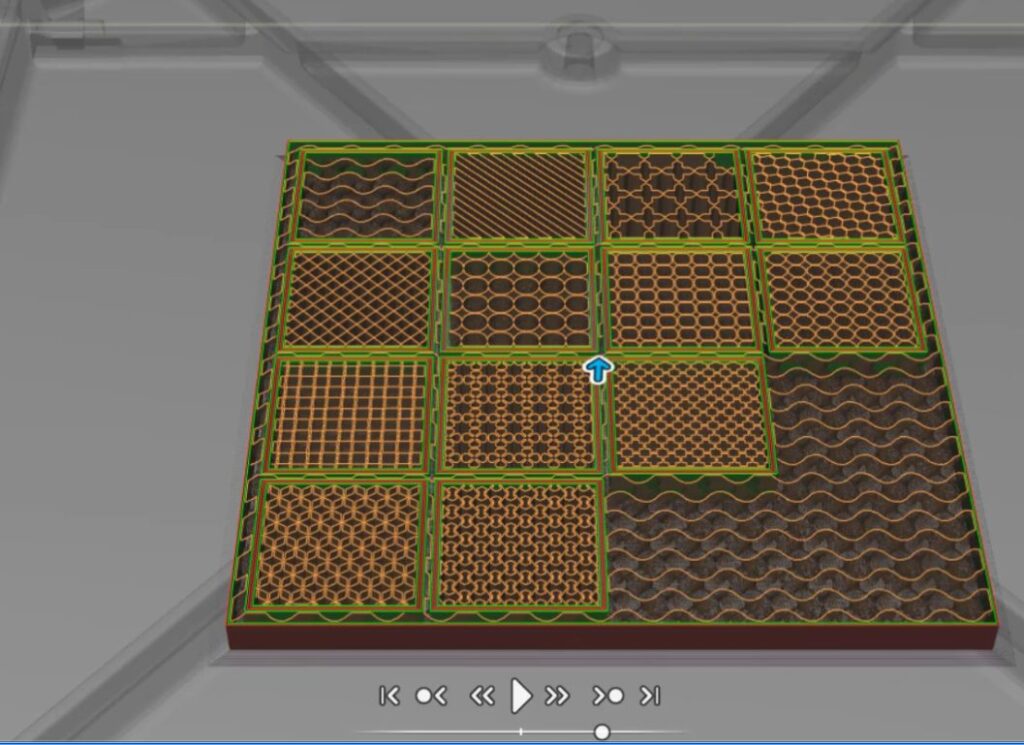
Related print settings: Infill Density (%), Infill Pattern, Infill Angle (deg), Perimeter-Infill Overlap Ratio, and many more.
Bridging
Bridging allows the printer to span gaps between two points without the need for support structures. Fusion automatically manages the direction of these specialized toolpaths while offering users the ability to set their preferred bridging speed in the Speed tab of the print settings. Although the default speed is generally suitable for most applications, users can fine-tune it according to their printer and material specifications.
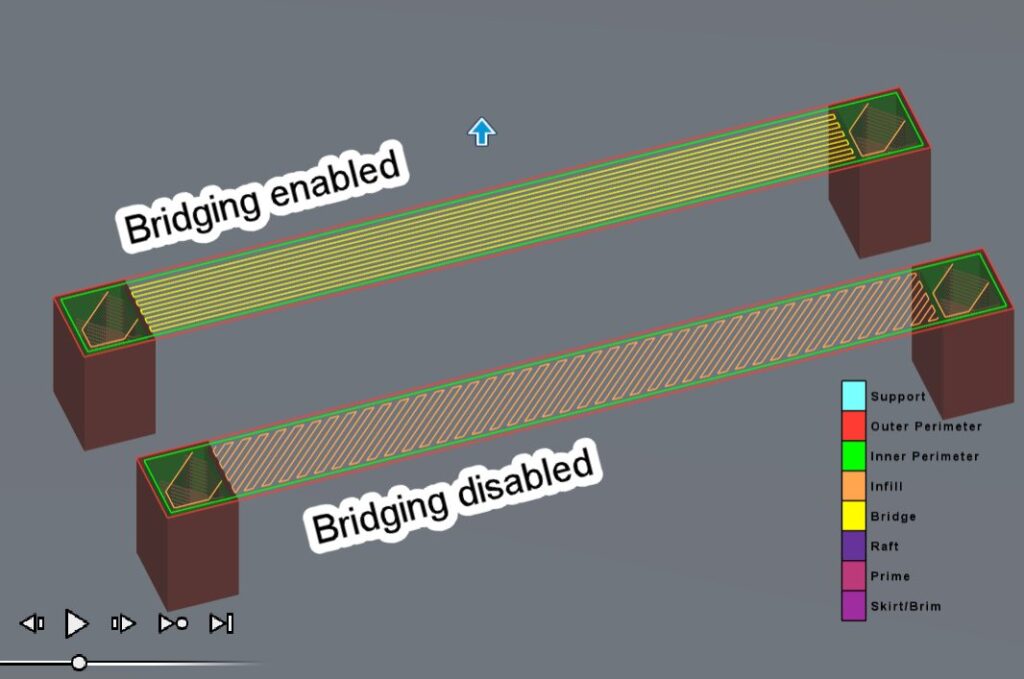
Related print settings: Bridging, Bridge Extrusion Width (mm), Bridge Speed (mm/s), and many more.
Support structures
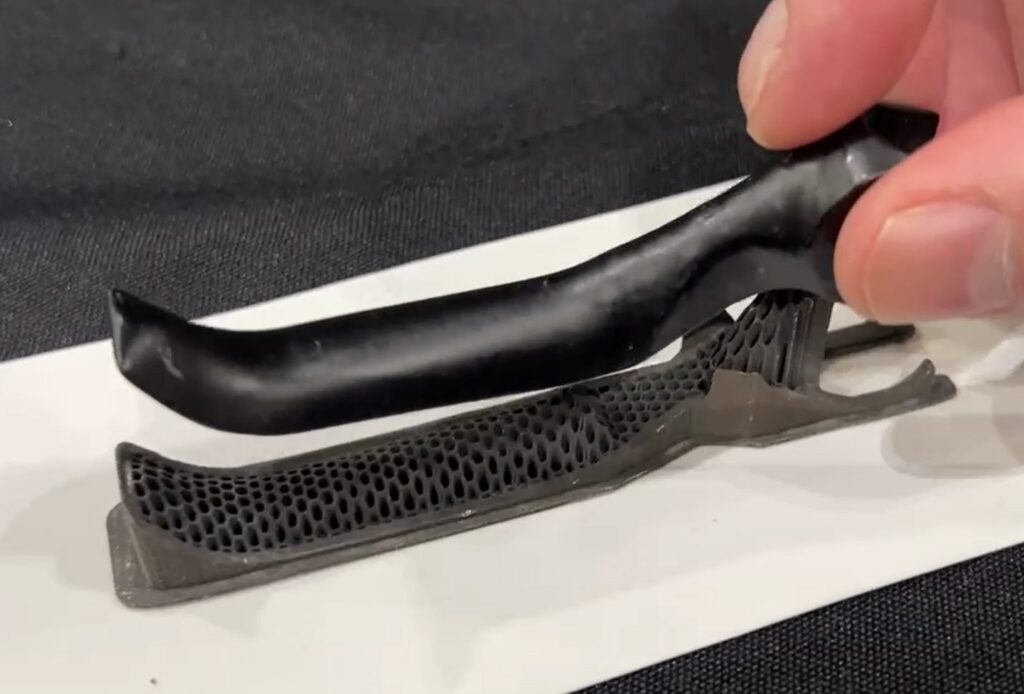
Fusion’s robust support settings for FFF include volume supports, bar supports, setter and base plate supports. Volume supports are fantastic at supporting large overhanging areas, and can be used in the majority of cases. Bar supports are particularly useful when trying to support smaller overhanging regions that are further away from the print bed. A great example of both these supports in use, is the table foosball player below.
Setter supports are especially valuable when working with metal filament parts, serving as cradles during the sintering process to reduce warping and distortion. More information can be found in our tutorial video, guiding you through the addition of support structures in Fusion.
Related print settings: Support Extruder, Number of Support Perimeters, Number of Support Top Layers, Number of Support Bottom Layers, Support Infill Density (%), and many more.
Speed control
In Fusion, users have full control over their print speeds, with customization options for each toolpath type. Users are also able to adjust the jerk and acceleration settings, which can all be found in the Speed tab of the print settings, allowing precise adjustments for optimal print quality and efficiency.
Useful hint! The Layer 1 Speed Multiplier settings scale the printing speed for each toolpath type by the entered value. This means the first layer toolpaths are printed much slower than the rest in order to help the part to adhere to the print bed. This gives your print a better chance of success whilst only marginally increasing the overall printing time.
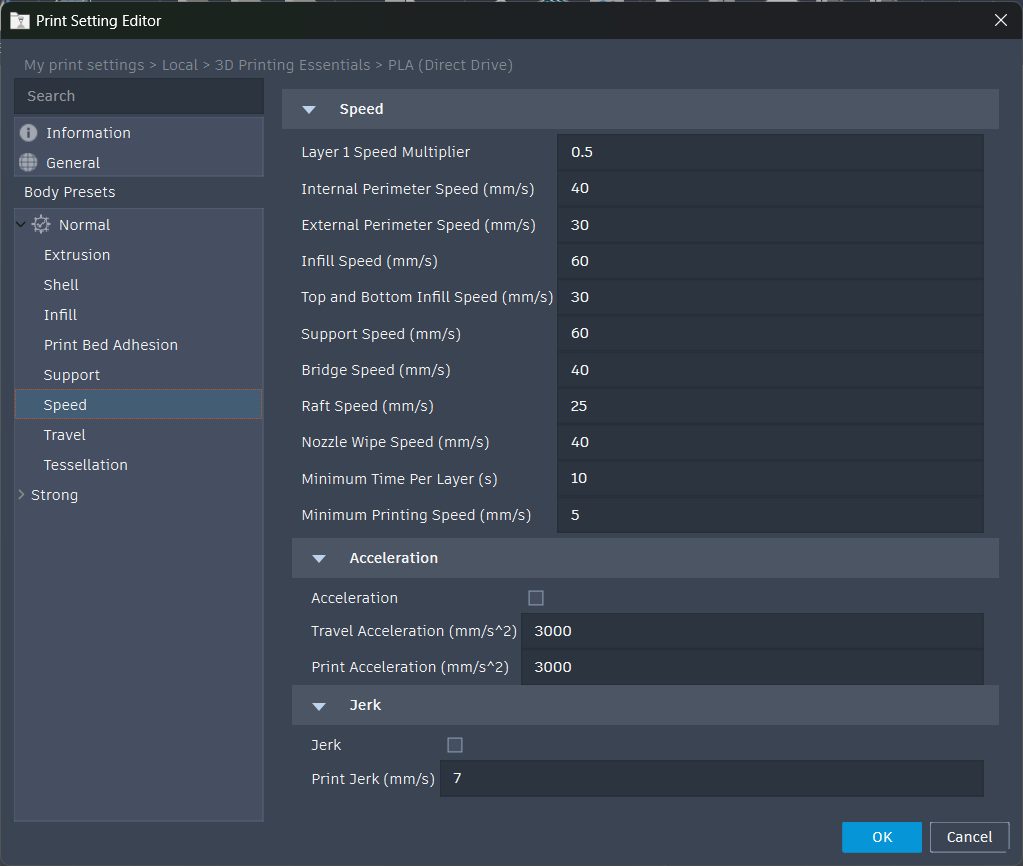
Related print settings: Layer 1 Speed Multiplier, Infill Speed (mm/s), Top and Bottom Infill Speed (mm/s), Support Speed (mm/s), and many more.
Dual extrusion
If your printer supports multiple extruders, Fusion enables you to utilize this capability to its fullest extent. In the Extrusion tab of the print settings, users are able to configure their settings on a per-extruder basis.
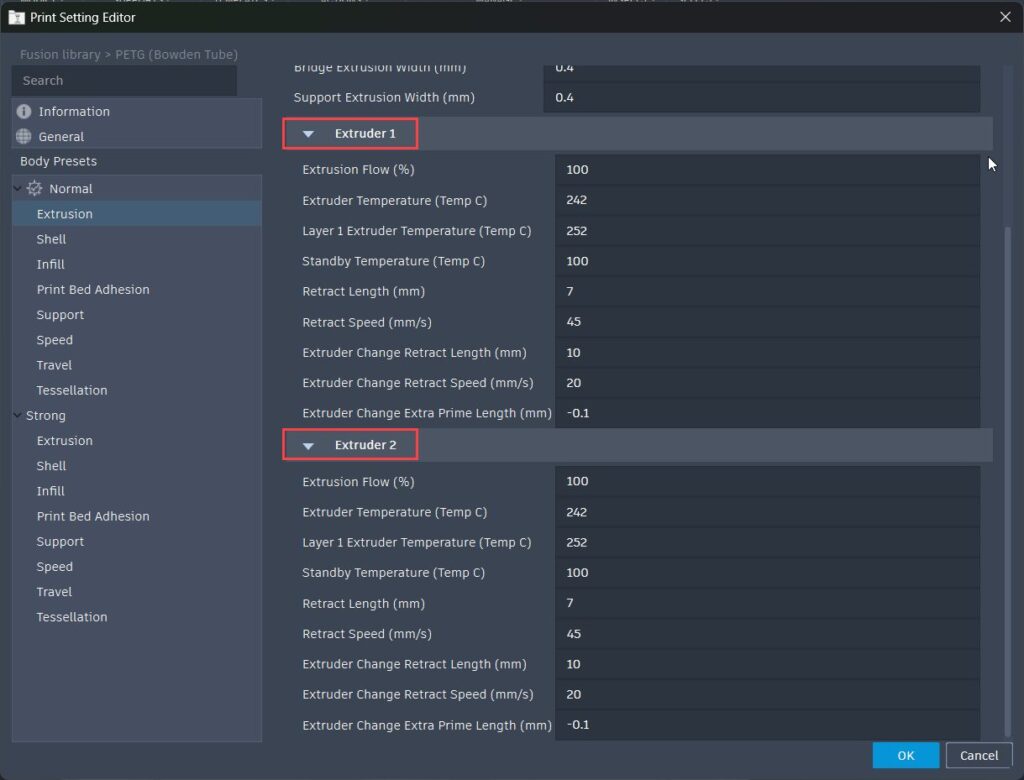
This enables users to print with different colors and materials, producing more aesthetic and high-performing parts. For a step-by-step guide of how to do this, please refer to this detailed tutorial video.
Related print settings: Part Extruder, Support Extruder, Extruder Change Retract Length (mm), Extruder Change Retract Speed (mm/s), and many more.
Special features
Curved toolpaths
Fusion stands out not only as a slicer but also as a powerful CAD software. Slicing Brep models directly without converting them to meshes eliminates the need for tessellation, enabling the printing of true curves and arcs. Fusion supports these by generating G2 and G3 moves instead of many G1 segment moves, significantly reducing the number of lines needed to print curves and resulting in smoother arcs. If this sounds interesting to you, then check out this video showing how to do this in Fusion.
Related print settings: Generate G2/G3 Moves.
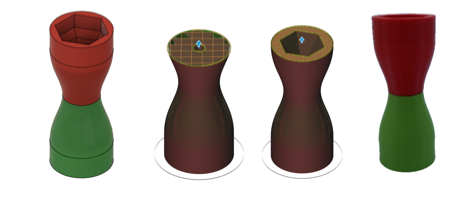
Spiral vase mode
Spiral vase mode is fantastic for creating bodies with a single continuous helical toolpath. Without the need for retractions, this mode quickly produces thin-walled parts with exceptional wall quality and no seams.
Related print settings: Spiral Vase Mode.
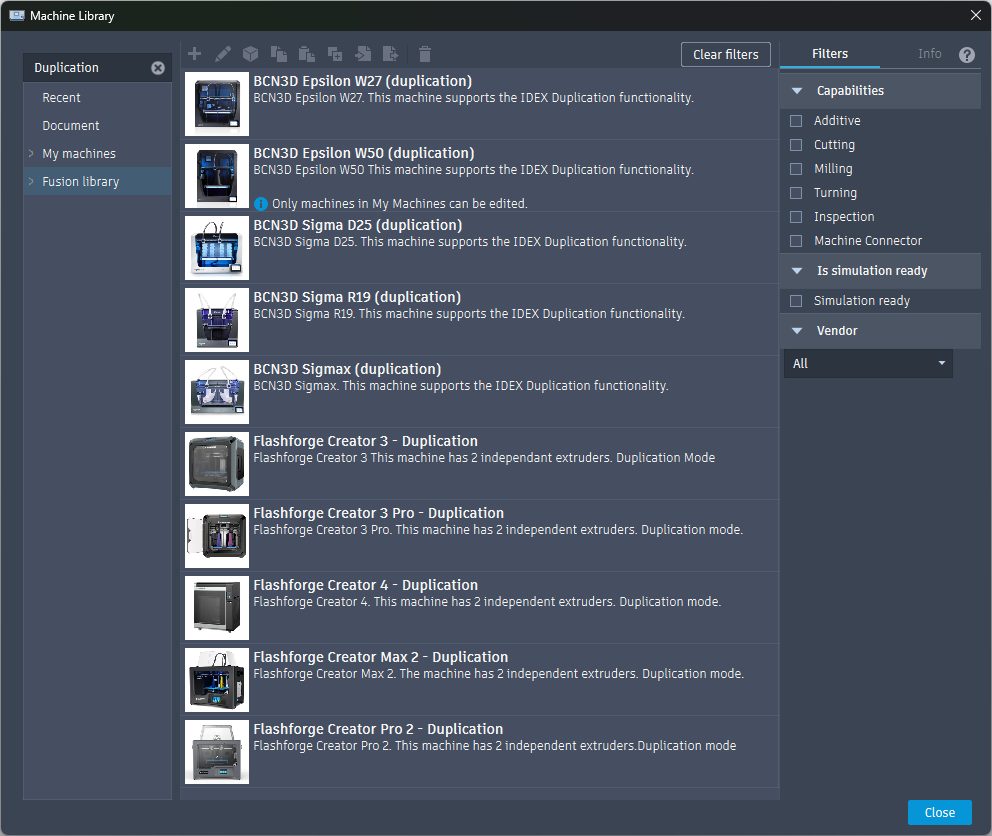
Mirror and Duplication with Independent Extruders
For specific printers equipped with Independent Extruder heads, Fusion supports functionalities like duplication and mirroring. This allows the simultaneous printing of two identical parts, effectively doubling productivity compared to conventional printers. To use this functionality, simply select a machine with “Duplication” or “Mirror” in its name from the machine library, and create your print file as you usually would. The duplication and mirroring functionality is handled automatically.
What does each print setting do?
Finally, for a complete breakdown of the FFF print settings and what they do, please read through our handy tooltips, by hovering over each of the settings. If you have any specific questions, please reach out to us on the Fusion manufacture forum at forums.autodesk.com.