The Renishaw Fixturing and Styli Add-In for Autodesk Fusion streamlines the process of creating inspection fixtures and toolpaths, integrating Renishaw components and styli, and simplifying procurement with detailed assembly instructions and direct ordering capabilities.
Digital transformation is changing the landscape of the manufacturing industry. Power players are coming together to leverage decades of expertise, drive technological advancement, and deliver exceptional value to customers. With a relationship spanning several years, Autodesk and Renishaw have successfully integrated their technologies to offer advanced solutions such as Renishaw’s probing library, on-machine verification, and metal additive workflows within Autodesk Fusion. This synergy has not only facilitated the development of cutting-edge manufacturing processes but also provided users with comprehensive tools for fixture creation and inspection.
A notable benefit of this collaboration is the Renishaw Fixturing & Styli Add-in, which brings significant enhancements to the Fusion user experience. The add-in allows users to insert Renishaw fixture components to build their inspection fixtures, simplifying the build process with assisted component placement. Additionally, users can import Renishaw styli into their Fusion tool library, enabling a more seamless integration with inspection toolpaths. The add-in provides detailed assembly instructions, helping users bring their fixtures to life with precision and ease.
Getting started guide
Welcome to our how-to guide on how to use the Renishaw add-in to build fixtures and inspect tool paths in Autodesk Fusion. Follow along as we walk through each step of the process so that you can easily replicate the workflow in your own projects.
Save the document
First things first, we’ll start by saving the active document. This ensures that all changes made during the session are preserved.
Run the Renishaw Fixturing and Styli add-in for Autodesk Fusion
Once you save the document, navigate to the utilities tab to run the Renishaw add-in. This powerful tool will aid in building and inspecting fixtures.
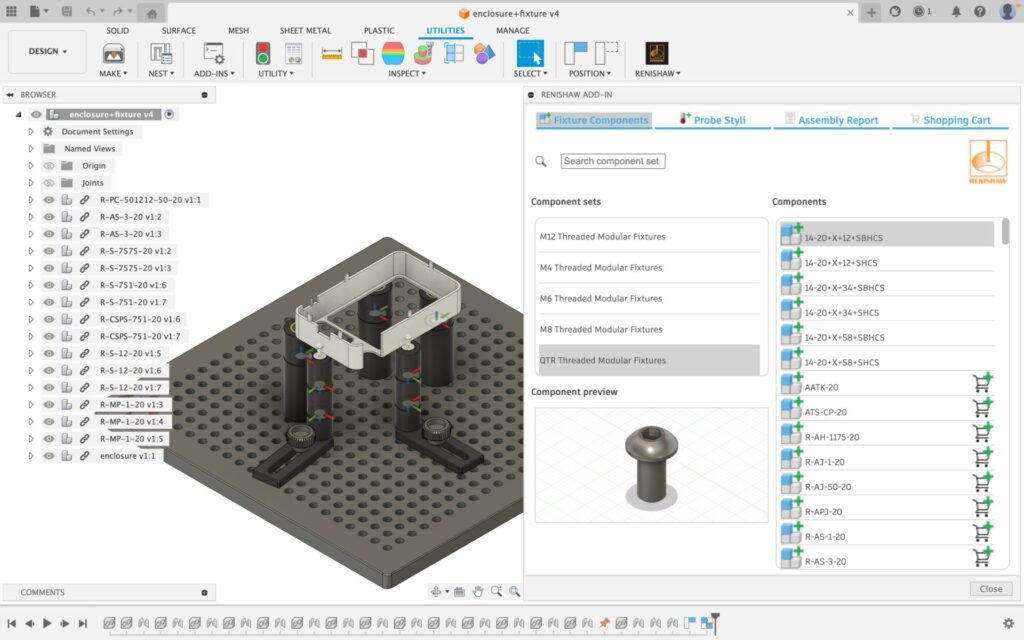
Selet the component set
After the add-in loads, select the component set that you’ll be working with. This is a crucial step in setting up your workspace.
Search for a plate
Use the search functionality to find a plate. Once you locate the plate, insert it by clicking the “Insert Component” button. This forms the foundation of your fixture.
Build up the fixture
With the plate inserted, you can start building up your fixture. Insert additional components by scrolling through the list or using the search functionality. When you find the desired component, click “Insert Component” to add it to your document. You’ll be prompted to select a connection point, and a preview of the connection will be shown. Click OK to apply it.
Connect the components
As you insert components, notice the alphanumeric position displayed in the connection point window. This helps in positioning each component more precisely. This part of the video is sped up to avoid repetition as we build the fixture.
Stack the components
Now that components are connected to the plate, you can stack components onto the connected components. Insert the component as usual and select a connection point on one of the existing components. The connection will be previewed, and you can click OK to accept it. This step is also sped up to avoid repetition.
Add the part
Once the fixture is built, add your part by dragging it into the active document. Align the part with the fixture using joints.
Constrain the part
Start by creating a planar joint between the top surface of the fixture and the bottom surface of the part. This constrains the part in the Z-axis. To constrain the part further, use joints or the tangent relationship command to constrain the part in the X and Y axes.
Final adjustments
For any free components or stacks, position them manually and use a joint or the tangent relationship to lock them into place. Once the fixture and part are constrained, switch to the manufacturing environment.
How to use the Renishaw Styli and Fixturing Add-In in the Autodesk Fusion manufacturing workspace
In the manufacturing environment, use the Renishaw add-in to add probe-style tools to your Fusion tool library. Click “Probe Styli,” find the stylus you’re looking for, and click “Insert Stylus.” The stylus will be added to a tool library called Renishaw.
Create inspection toolpaths
With the probe stylus imported, return to your project create a setup and program inspection tool paths using the stylus. This helps to ensure more precise measurements and quality control.
Generate an assembly report
Once you’re happy with the fixture design, generate an assembly report in the add-in. Click the Assembly Report tab, and a report will be automatically generated. The report includes instructions, alphanumeric positions of components, and images in a bill of materials. Customize the report by adding your own images, and export it as an HTML file to share with others.
Order components (only available to users in the US)
The final step is to order the components required to build the fixture. On the shopping cart tab, add fixture components and probe-style tools from your document or catalog. Adjust quantities, remove components as needed, and submit the bill of materials to Renishaw. Fill out the form that pops up in your browser to complete the order. When you click “Submit Bill of Materials,” you’ll receive a message that Renishaw will contact you to finalize the order.
Along with a more streamlined procurement process, US-based Fusion users are eligible to receive a 10% discount when ordering through the Renishaw Fixturing and Styli Add-in for Autodesk Fusion, enabling not only efficiency but also cost-effectiveness.
Go from concept to design to order placed with the Renishaw Fixturing & Styli Add-in for Autodesk Fusion
The Renishaw Fixturing and Styli add-in is the first full featured CAD/CAM workflow that brings users a virtual environment to create inspection fixtures via access to hundreds of Renishaw fixture components, then provides step-by-step instructions to bring those inspection fixture designs to life. It also provides a styli library for programming inspection toolpaths. The Renishaw Equator post processor in the Fusion post processor library allows users to turn their inspection toolpaths into a process control program for their Renishaw Equator through utility provided by Design Software International (DSI), an Autodesk and Renishaw Gold Level Integrator. Perhaps one of the most useful features of the add-in is the ability to automatically create a cart for the fixture components and stylus used in your project, and have the cart submitted to Renishaw so you can get the correct components and styli you need to bring your project to life.
This unique ordering experience is a new development from Autodesk through its cloud design and manufacturing offering, Autodesk Fusion. Now users will have the ability to go from concept to design and subsequently to ordering all while helping to ensure that the exact parts in their design are what makes it onto their order sheet.
This step-by-step guide helps you efficiently use the Renishaw add-in to build fixtures, inspect tool paths, and order necessary components. Happy designing!