Build a Fusion add-in without coding using AI agents. Learn how the Fusion MCP connects tools like Claude and Cursor to automate workflows, test scripts, and accelerate add-in development.
Elevate your design and manufacturing processes with Autodesk Fusion
The Claude Desktop connector for Fusion arrived alongside something just as monumentus official MCP’s for Fusion. Any tool that supports the Model Context Protocol can now connect to your live Fusion session.
That means AI help now comes from two directions. Autodesk Assistant is built into Fusion for guidance and answers while you work, including scripting and add-in questions. And with open access to the Fusion MCP and Fusion Data MCP, external tools like the Claude Desktop connector or an editor like Cursor can connect to Fusion for heavier, agentic work. They solve different problems, and there’s room for both. The whole point of an open standard is that you pick the tool that fits the task, and you can use more than one.
This article walks through one of those tasks: building your own Fusion add-in, with no programming knowledge, by working through it with an AI agent as your partner.
The value of AI agents in add-in development
Many useful automation ideas never become formal projects. More often than not, they’re too specific to justify a full development effort. There’s no point spending two weeks of software engineering on a one-time task worth a few hours. Other times there’s never enough time to build a prototype that proves the idea is worth pursuing.
A good agentic workflow fixes both problems. These automations and feature prototypes take a few hours at most, and they don’t require software engineering knowledge.
How the Fusion MCP helps
Connecting to the Fusion MCP makes an AI agent noticeably better at writing add-ins, and it saves both time and tokens. Two things matter most:
- It gives the AI live access to Fusion. Agents can run test scripts in your active session instead of guessing from static code, which tightens the feedback loop considerably.
- It provides up-to-date Fusion programming knowledge. The tools pull current documentation, so the agent isn’t working from outdated assumptions.
Choosing an AI tool
Any tool that supports the Model Context Protocol can connect to Fusion, which gives you options. Autodesk Assistant lives inside Fusion and is the quickest way to get help in context. The Claude Desktop connector gives you an agentic workflow through an official, low-setup integration. Editors like Cursor sit at the developer end of that range.
For this tutorial we’re using Cursor. It’s an AI-oriented text editor popular for AI-assisted development, and for add-in work it has two practical advantages: it’s faster at coding tasks, and it shows you more of what’s happening as it works. It also lets us demonstrate the Fusion MCP without an official connector, so you can see how the underlying integration works.
None of these tools cancels out the others. Autodesk Assistant, the Claude Desktop connector, and Cursor each fit a different point in the workflow, and most people will end up reaching for more than one.
Setting up the Fusion MCP in Cursor
Prerequisites
Before you begin, make sure you have:
- Autodesk Fusion installed and up to date
- Cursor installed
Step 1: Enable the MCP server in Fusion
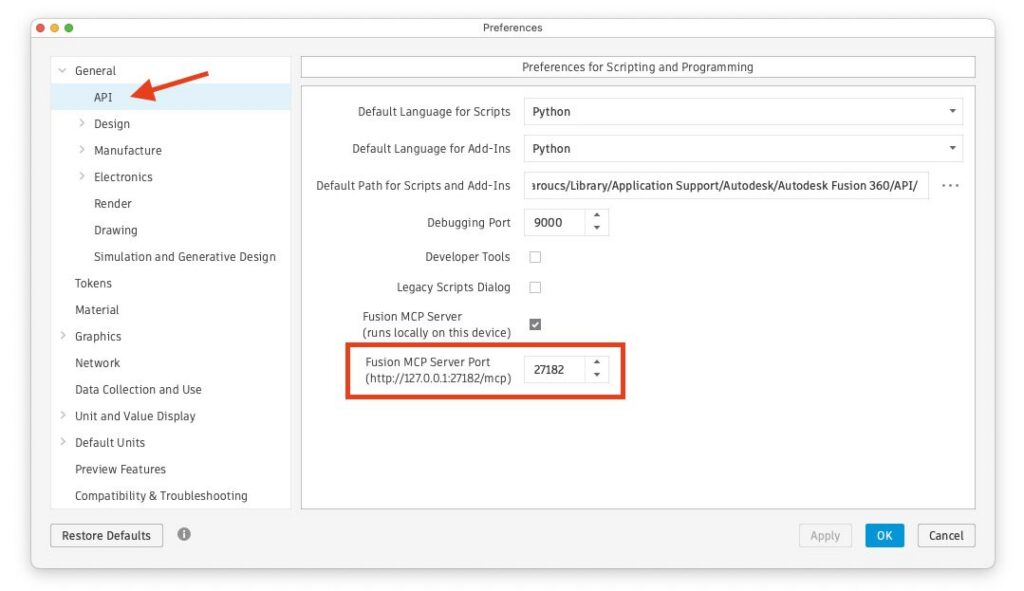
Open Fusion and navigate to Preferences > General > API. In the Preferences for Scripting and Programming section, enable Fusion MCP Server. Note the port number. The default is usually 27182.
[Screenshot: Fusion Preferences panel showing Preferences > General > API, the Fusion MCP Server checkbox enabled, and the port number visible.]
Step 2: Add the Fusion MCP server to Cursor
In Cursor, open the MCP settings (Settings -> Cursor Settings -> Tools & MCPs) and click New MCP Server to add the Fusion MCP. It opens an mcp.json config file listing the MCP servers Cursor can connect to. Add a Fusion server to the list using http://127.0.0.1:27182 as the URL. It should look like this:
{
  "mcpServers": {
    "fusionMCP": {
      "url": "http://127.0.0.1:27182"
    }
  }
}
Make sure the port in Cursor matches the port shown in Fusion preferences.
Once connected, Cursor’s agent can use Fusion MCP tools during a chat. For add-in development, that means it can query documentation, run Python in Fusion, inspect errors, create test geometry, and check whether the generated add-in behaves as expected.
Step-by-step development of a vent pattern generator add-in
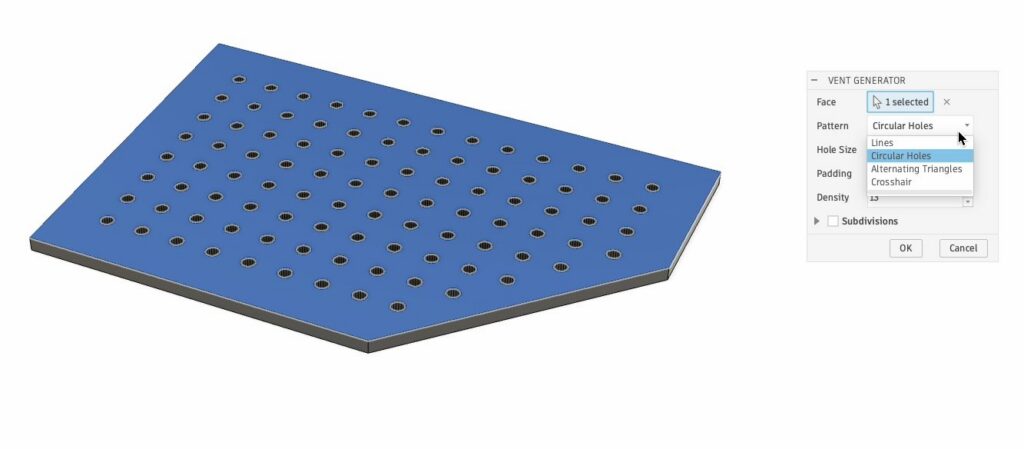
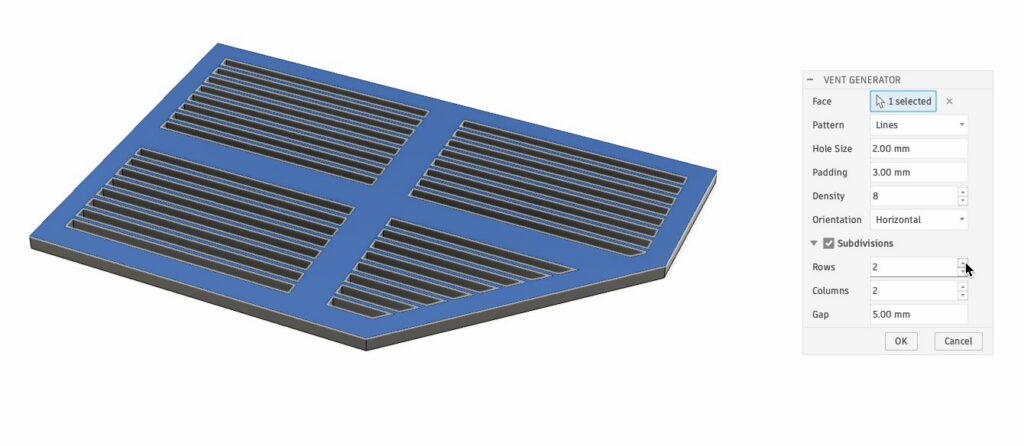
Through this example, we’ll build an add-in that procedurally generates vents on Fusion geometry. It will support:
- Selection of a face on which to create the vents
- Multiple vent pattern types: lines, circular holes, honeycomb, diamond grid, and so on
- Padding from the face boundary
- Pattern density controls
- Pattern subdivision with configurable rows, columns, and subdivision gap
- Optional partial holes at clipped boundaries
The goal is to show how a plain natural-language conversation with an AI agent can produce a working Fusion add-in, without writing code or using any advanced technique. Think of the agent as a capable teammate: you bring the intent and the judgment about what “right” looks like, and it handles the implementation.
One note before we start: we used Claude Opus 4.8 here, but any recent model should do fine.
Step 1: Prepare the add-in template
There’s an existing Python add-in template you can hand to the agent so it follows good add-in practices from the start. Using it also lets you skip the architecture and planning questions while you get going.
Start by creating a root directory for everything related to your add-in. This can be anywhere on your computer. We called ours VentGenerator.

- In the Fusion menu bar, under the
Utilitiestab, click theScripts and Add-insbutton.
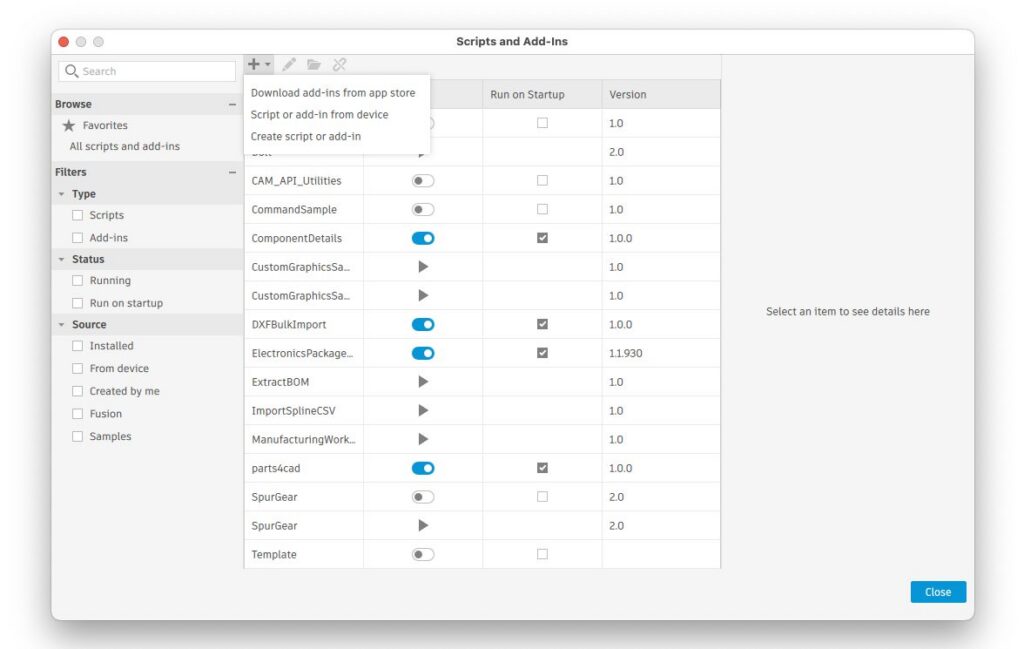
- Click the
+button and selectCreate script or add-in.
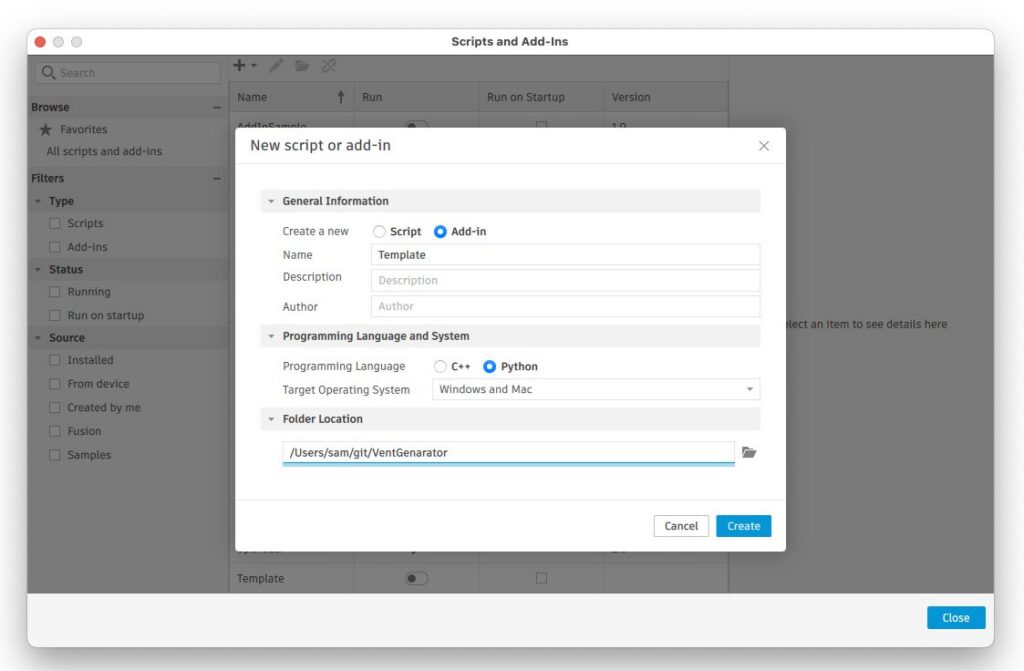
- In the
New script or add-inwindow, select theAdd-inoption (it defaults toScript). Name itTemplateand save it in your new add-in’s directory. - Open your add-in directory in Cursor with
File > Open Folder..., or open it as a project from Cursor’s home window.
Step 2: Start with a proof of concept prompt
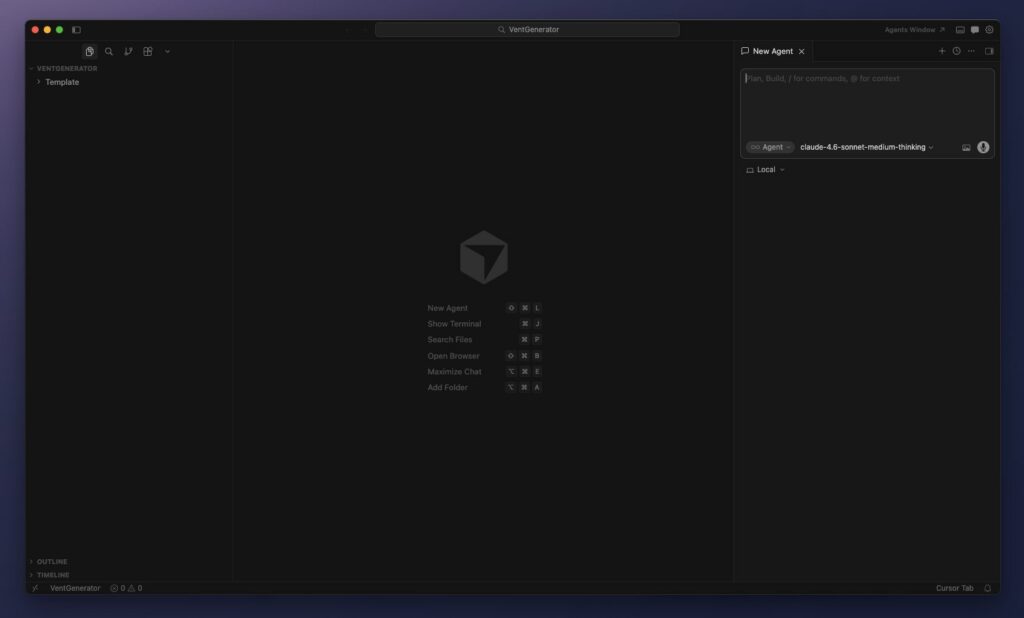
With everything set up, you should have Cursor open on a project containing only the Template folder, like the screenshot above.
Now you can start prompting.
Aim first for a simple add-in you can test quickly, one that acts as a prototype to refine and build on. Take a moment to think through the core components and identify the sources of complexity worth leaving out of the proof of concept.
In our case, we have plenty of vent patterns in mind, but we’ll limit ourselves to the two simplest ones. We’d also like to add vents to any existing body, but that’s too complex for this iteration. We’ll take a construction plane as input and create a rectangular body from it for the vent.
With that in mind, here’s our starting prompt:
Create a Fusion add-in that procedurally generates vent patterns. The user should be able to select a plane, choose a pattern (lines or circular holes), set the vent dimensions (height, width, thickness), adjust pattern density, and control subdivisions (rows and columns). Use the provided add-in template in the @Template folder as a starting point.
This follows a good recipe for getting started. It includes:
- Clear intent up front, with a one-line summary of what the add-in is for
- A full list of the command inputs you need
- An instruction to use the provided template
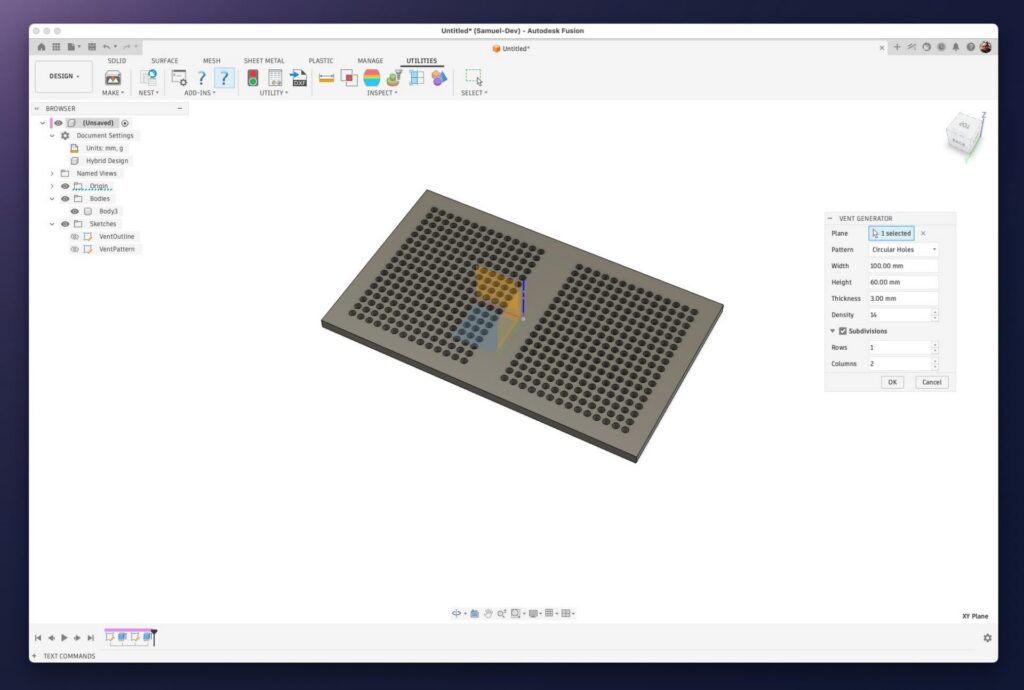
After a few minutes of work from the agent, you can test the result. To do so, enable it in Fusion. Find the Scripts and Add-ins button in the Utilities panel, scroll to your new add-in, and activate it with the toggle switch. A new button appears in the menu bar next to the Scripts and Add-ins one. Click it to test the add-in.
Remember this procedure. You’ll repeat it to reload the add-in whenever it changes.
Here’s the result:
Step 3: Test and fix issues before adding complexity
Check for performance issues early
After the first prompt, we already have a functional prototype. Test it thoroughly now, so that any mistake the agent made can’t snowball as you add features and complexity underneath.
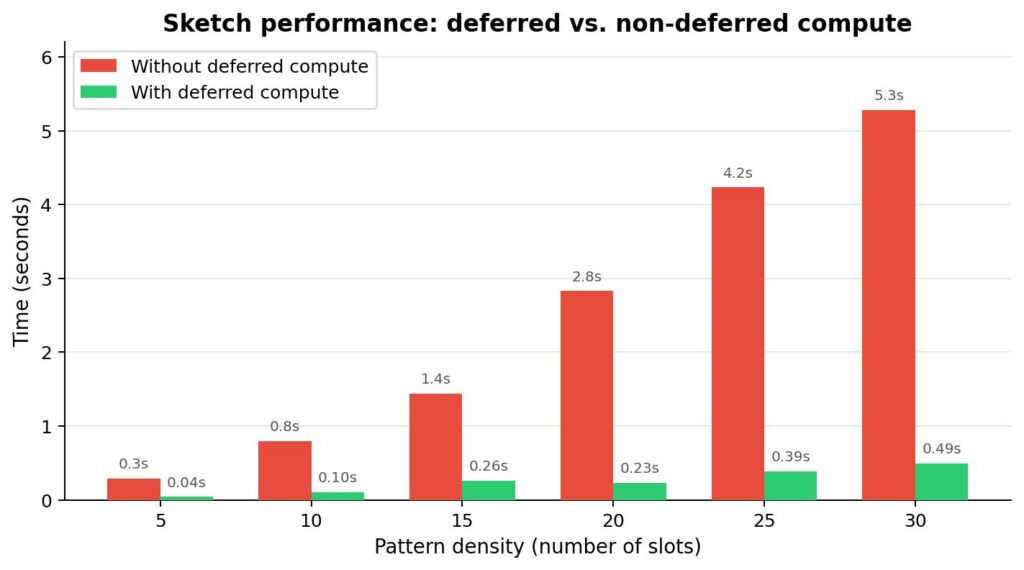
Agents frequently struggle with performance, so test with input values that take longer to process, and do it as early as possible. In our case, making the vents more dense brought significant slowdowns.
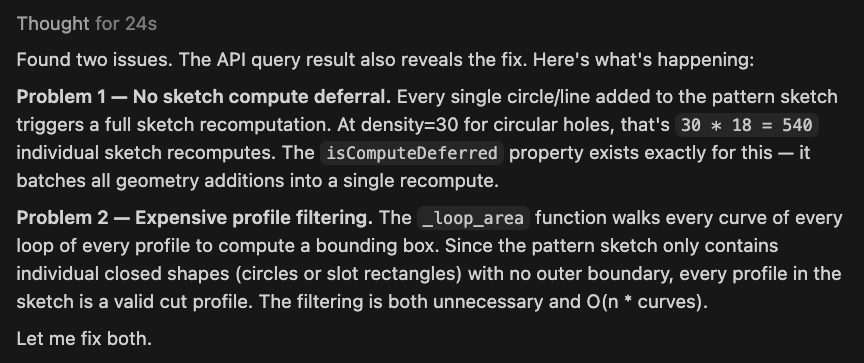
That makes sense, because there’s a feature in the API called deferred compute that the agent won’t reach for unless you mention performance directly. Simply asking the agent to look into the slowdowns resolved it:
Look into slowdowns and performance issues. It becomes an issue as we increase density.
The agent analyzed the code, searched the API for performance-related terms, and fixed the issue effectively:
Small refinements
This is also a good point to ask for minor changes until the prototype feels right. The agent keeps building on top of what’s there, so it pays to make the building blocks as solid as possible.
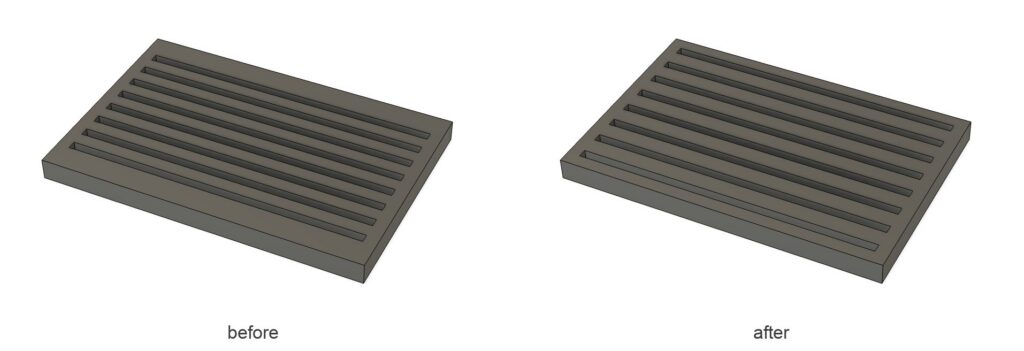
One thing needs fixing here. The linear vent pattern starts with a “gap” instead of a hole (see the before/after image below). That’s not what we had in mind:
The line pattern should start immediately with a hole (and end with a hole) so that padding actually looks the same on each side.
It’s also a good time to review the experience and reconsider the inputs. After testing the vent generator for a while, we decided the prototype wouldn’t feel complete until the user can adjust a few more measurements, so we need to add them as inputs. We also want to hide the orientation input when it doesn’t apply, and rename a few inputs for clarity.
Add the following inputs: Hole size (in mm), Padding (in mm), and Orientation (vertical or horizontal). Orientation should only be visible for patterns that are affected by it.
These small corrections help clarify your intent for the agent as you go, keeping its work in line with what you have in mind.
Step 4: Add features
Now that we have a strong, functional foundation, we can add features. From here it’s iterative: add a feature, test, improve, test again, move on to the next.
Let’s start with a big one. The add-in currently selects a construction plane and creates a rectangular vent of a set size. That was useful for a prototype, but it isn’t how the final add-in should work. What we actually want is to select the face of a body and generate ventilation holes on that face.
Here’s the prompt:
Instead of selecting a plane, I’d like to be able to select a face of a body. The height and width inputs would be removed and the pattern would cover the entire face. Padding would apply to the face’s outline.
In the presence of irregular faces and curved features, we need to allow for incomplete holes so we can clip the pattern.
The agent had to rework the add-in’s architecture completely, but because it started from a solid implementation, it did so without any hiccups.
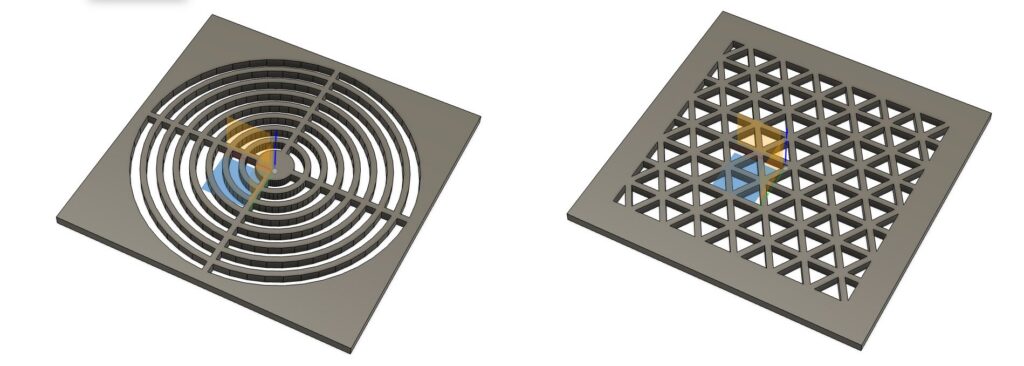
Step 5: Iterate
From here, keep improving the add-in iteratively, essentially repeating steps 3 and 4 for as long as you need. That’s really all there is to it.
In our case, we kept experimenting with vent patterns. This is where AI is genuinely useful: you can brainstorm, find ideas, describe them visually to the agent, and let it work out the implementation.
Additional tips
A few tips we didn’t cover above that will make the process smoother:
- Start with a minimum viable product. Ask for the smallest complete add-in that exercises the full workflow: command dialog, geometry creation, and modeling operation.
- Use screenshots as requirements. For visual patterns, annotated screenshots are more effective than long descriptions.
- Correct one behavior at a time. Short prompts like “padding should never contain holes” are easier to implement and easier to verify.
- Ask for tests in Fusion. When a change touches geometry or the API, ask Cursor to test it through the Fusion MCP.
- Expect iteration. The first result may be functional but visually wrong. Treat that as part of the process, not as failure.
- Save before running modification scripts. The MCP supports undo workflows, but it’s still good practice to save important files before running generated scripts.
Where this fits
The vent generator is a small example, but the workflow scales. It works because you stay in charge. You bring the intent, the sense of what “right” looks like, and the call on when something is good enough. The agent handles the implementation.
That’s also why there’s no single correct AI tool for Fusion. Autodesk Assistant, the Claude Desktop connector, and editors like Cursor each cover a different part of the work, and the open MCP means you can move between them as the task changes.