When do animations come in handy for designers? How do you animate a design in Fusion? Look no further than this comprehensive tutorial.
When you think of animation, you probably envision the timeless classics of Dreamworks or Pixar; but, as we all know, animation can encapsulate a variety of different genres. As such, animation has more applications than just entertainment. Animation is an important tool to analyze aspects of a design before actually producing a physical prototype. It serves as a digital representation of a potential real-life scenario or object.
A motion study allows you to simulate how components and joints move over time, helping you visualize the assembly process or the function of a mechanism. When setting up joints, you may need to select specific components or options from menus to define how each part should move.
Elevate your design and manufacturing processes with Autodesk Fusion
Introduction to animation
Animation in Fusion offers much more than basic exploded views—it gives your designs life through motion studies. A motion study allows you to simulate the movement of components and joints over time, giving you valuable insights into the functionality and assembly of your model.
To start, navigate to the Assemble menu within the Model Workspace to create a motion study. Here, you can add and configure joints between components, specifying how each part should move relative to the others.
The animation timeline is your primary tool for controlling movement. By dragging and setting keyframes along the timeline, you can animate the positions and rotations of joints, resulting in smooth, realistic motion. Fusion provides a range of joint types and parameters, allowing you to animate everything from simple sliding parts to intricate mechanical assemblies. Adjusting these parameters over time allows you to visualize how your design will function in the real world.
After configuring your joints and components, you can refine your animation by adjusting the camera view and configuring the render workspace. This ensures that your final animation not only demonstrates the intended motion but also appears polished and professional. Whether you’re animating a character rig or a mechanical device, mastering the motion study and timeline tools in Fusion allow you to create compelling, functional animations that effectively communicate your design intent.
Motion study in design
Animation is an important tool during the industrial design process because it helps communicate the assembly design to collaborators, stakeholders, and customers. What better way to understand a 3D design than to break it apart into multiple different views? Stakeholders definitely want to know whether or not your product design functions correctly before approving it for production.
Animations can also be used to understand the functionality of a moving part. Perhaps you are designing a product that has two interlocking joints and want to test the spatial tolerances of said joints. By animating the joints, you can see where one joint might collide with the other. You can edit the trajectory and the speed at which your animation plays.
Fusion provides animation tools to test certain parameters and functionality.
Animating with Fusion
Fusion provides several options when animating a product design. You can create exploded views, edit an already completed animation, add trail lines, add annotations, publish, and share the animations by downloading a video file or viewing them in a web browser.
To get you started, here are simplified steps on how to create an exploded view animation using Fusion. For this example, envision a 3D box with a sphere in the middle.
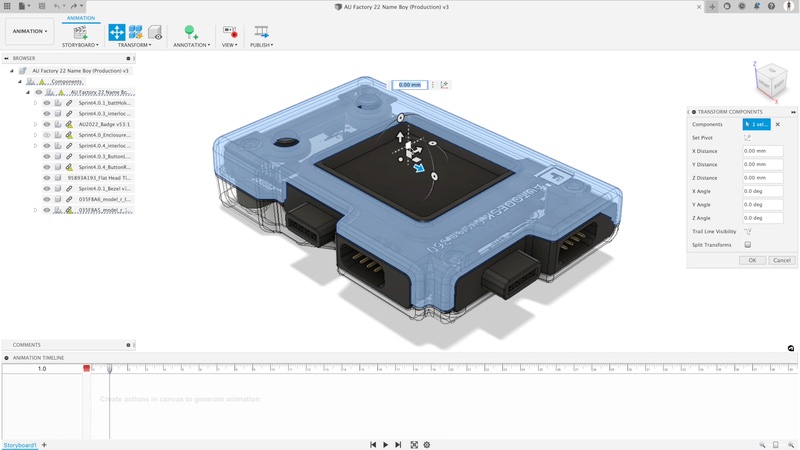
1. Design the components of the product you wish to animate. In this case, we have the AU Factory 2022 device.
2. With your design file open, make sure the Workspace is Animation.
3. Rotate and center the 3D design on the screen.
4. Drag the playhead on the timeline to the Scratch Zone. The Scratch Zone is the small space to the left of the beginning of the animation timeline.
5. Click the ViewCube in the faces of the design.
6. Pan / zoom to center the design.
7. Move the playhead forward on the timeline (1 second in the gif below)
8. Click on the desired component, then click the Transform command.
9. Move components to a position where they’re not hidden by other components, then zoom / pan to center the design.
10. Play the animation and review the timeline. Make adjustments accordingly.
Note: These steps are basic and serve as an example of where to start your product animation.
Rendering and output
After you’ve completed your motion study and are satisfied with the animation, it’s time to bring your work to life with the powerful rendering tools in Fusion. Head over to the Render Workspace, where you can prepare your animation for output. Here, you’ll set up your camera angles, adjust lighting, and fine-tune render settings to ensure your animation looks its best.
To render your animation, locate the Cloud Render button. You may need to perform an initial low-quality render to activate the full rendering options. Fusion allows you to render your animation as a high-quality video file (such as .mp4) or as an image sequence, giving you flexibility depending on your needs. The rendering process can take anywhere from a few minutes to over an hour, depending on the complexity of your animation and the quality settings you choose.
Once rendering is complete, you can download the rendered video and use it directly in presentations, share it with collaborators, or even convert it to a GIF for quick sharing online. If you want to add titles, music, or further edits, simply import the video into your preferred video editing software. This processmakes it easy to create professional-grade animations that showcase your designs in motion.
For more in depth information on how to create an explosion animation for your product, refer to Activity 1: Create an Animation of the Fusion 360 Animation Tutorials.
Not sure where to go from here? No problem. Fusion comes with additional tutorials and step-by-step articles to help you animate any product design.