This post is also available in:
Explore Autodesk Assistant in Fusion Tech Preview and discover new ways to model, edit, and manage workflows using natural language.

Today’s a big day for Fusion (and for us): the new Autodesk Assistant is now available in-product in Fusion as a Tech Preview. We’ve been heads-down building this to help you stay in flow getting answers, guidance, and running actions through natural-language. These map right to standard Fusion operations in your workflow and more importantly, your timeline.
Table of Contents
- Part 1: Anchor Assistant to the right context
- Part 2: Ask, confirm, execute.
- Part 3: Full workflows you can use immediately
- Part 4: Query your model in real time
- Part 5: Learn and troubleshoot without leaving Fusion
- Part 6: Manufacturing actions, insights, and advice
- Part 7: Onboarding users, permissions, and collaboration
- Part 8: File workflows
- Wrapping up
Like any AI-powered tool, it’s going to improve as we learn from real usage. In Tech Preview, you should expect some limitations and rough edges but there are already some genuinely amazing time-saving workflows you can start using today. This guide is intentionally practical and a bit “long-form”: it’s a reference you can come back to for prompt patterns, step-by-step workflows, and troubleshooting tips as you get comfortable with Assistant. And we’ll keep expanding this as we fix, refine, and ship new capabilities.
Most of the datasets used in the examples throughout this guide come from the new Fusion sample designs we’ve recently added so feel free to open them and follow along as you try the prompts.
And a quick heads-up: Workflow 3.3 is the standout (in this author’s opinion) if you try only one workflow from this article, make it that one.
Why we’re doing this: If you’re wondering what this means for your work specifically, Autodesk Assistant isn’t here to replace engineering judgment. It’s built to remove friction: fewer repetitive clicks, fast answers, and guided execution of standard Fusion operations inside your existing flow, while you stay in control of decisions and outcomes.
Tech preview notice
Autodesk Assistant in Fusion is a Tech Preview.
That means:
- Capabilities and command coverage may evolve
- Some actions may fail, behave inconsistently, or be unsupported
- When Assistant can’t complete an action directly, it should still be able to explain the limitation and walk you through a manual workflow
The “skip-reading-this-blog” to getting good results
Best practice: ask Assistant to propose steps first before executing anything.
Use this 3-part prompt formula
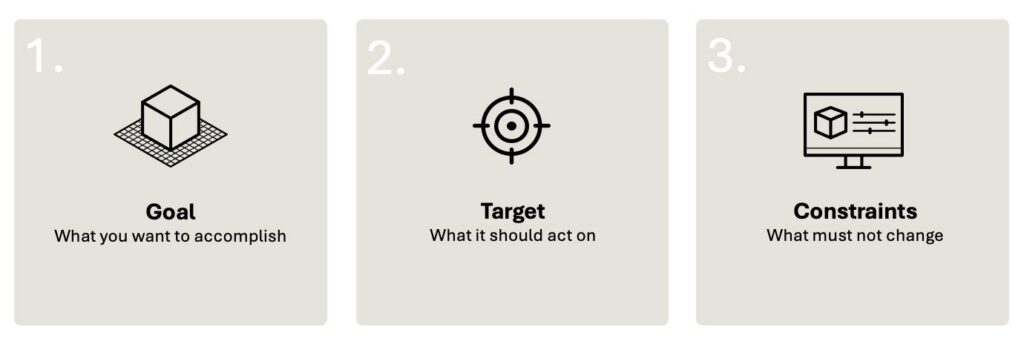
Prompt template:
“I want to [GOAL] on [TARGET]. Constraints: [UNITS], [DON’T CHANGE X] Propose the steps/commands first and wait for my confirmation before executing.”
Optionally, add one of these “quality boosters”
- “Ask me follow-up questions if anything is ambiguous.”
- “Use millimeters.” / “Use inches.”
- “If you can’t execute this directly, explain why and give me the manual steps in Fusion.”
Part 1: Anchor Assistant to the right context
Assistant performs best when it has clear context about what you mean.
Option A: Select geometry first (recommended)
Before you type:
- Select a face/edge/body, or
- Click the timeline feature you want to modify
Then prompt using “this selection” language
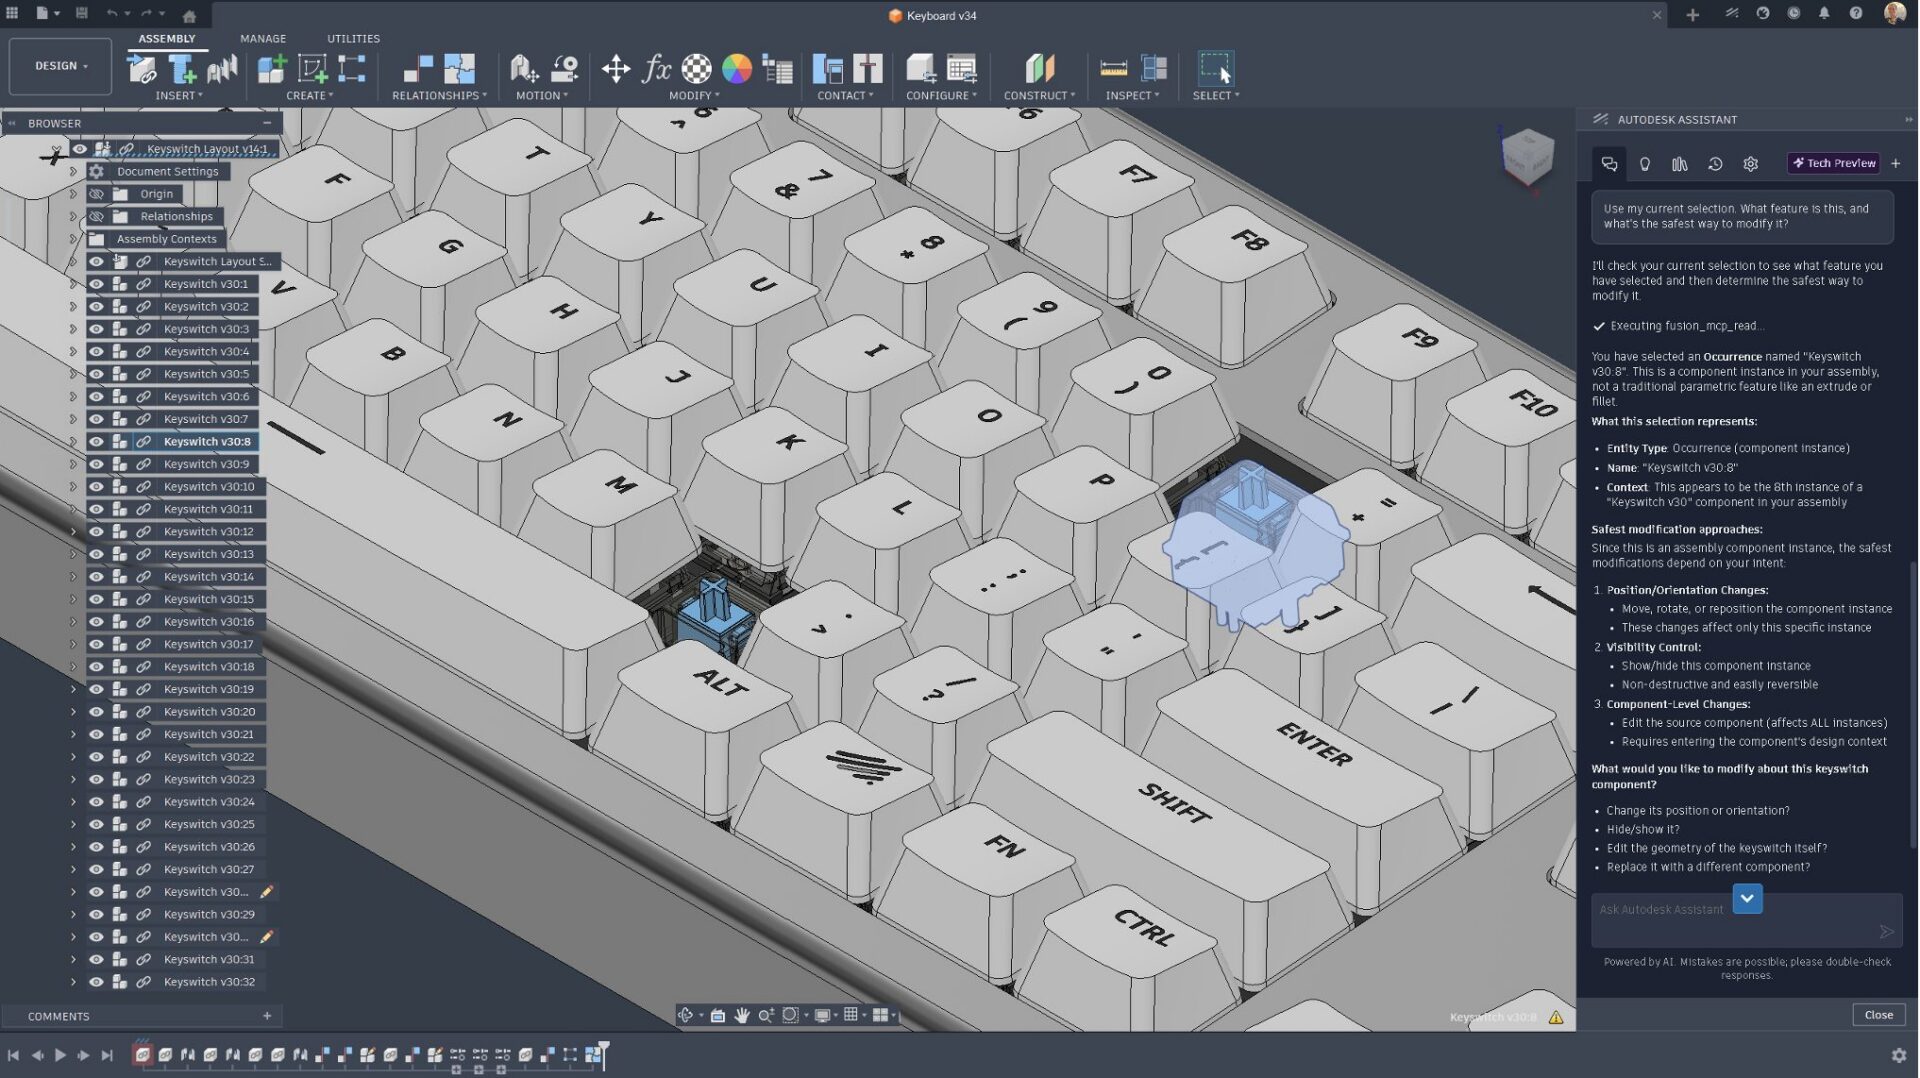
“Use my current selection. What feature is this, and what’s the safest way to modify it?”
Option B: Name the target explicitly
If you can’t select it:
“In the component named “Housing”, modify the shell feature to 2.5 mm and keep outer dimensions the same.”
Part 2: Ask, confirm, execute.
Run a command or model modification action safely with “Ask → Confirm → Execute”
This workflow keeps you in control and reduces surprises.
2.1 Ask (request a plan first)
“I want to fillet the appropriate edges to 3 mm on this part.
First select all of the edges and then tell me what feature you’ll create.
Don’t execute until I confirm.”
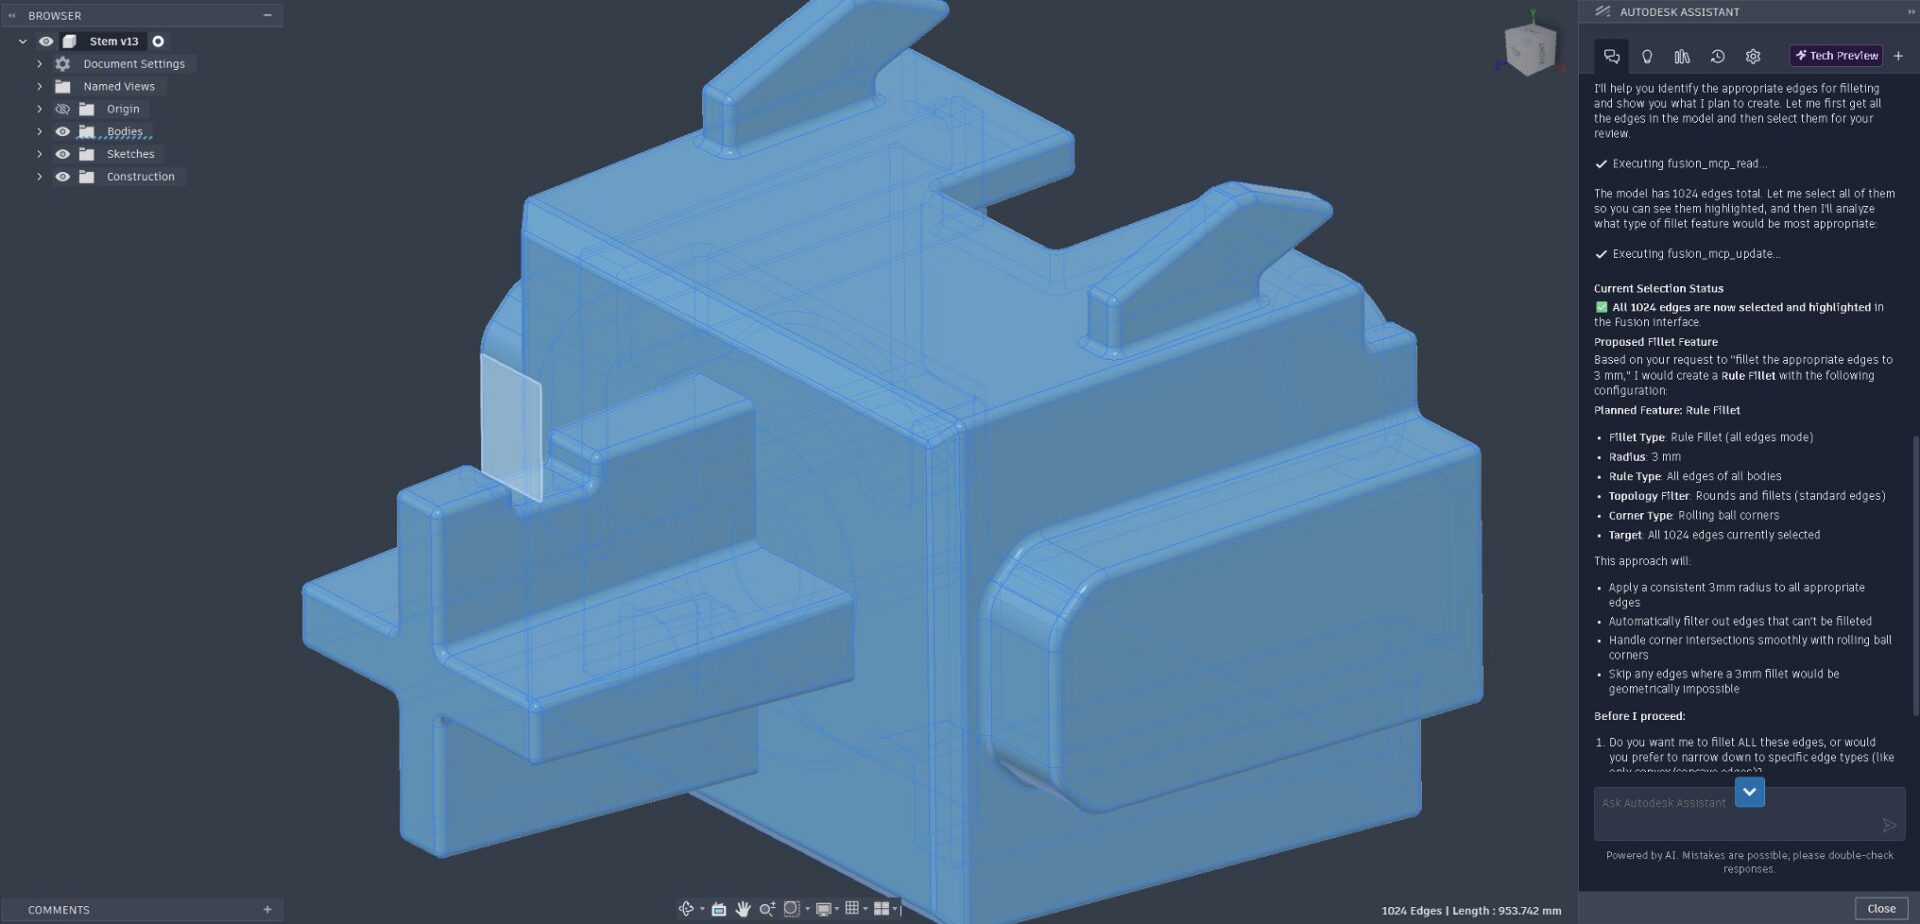
2.2 Confirm (review what Assistant proposes)
When Assistant responds, sanity-check:
- Did it interpret the right target edges?
- Are the units correct?
- Is it creating new features or editing existing ones (as you intended)?
2.3 Execute (explicitly approve)
Yes, go ahead and execute those steps.
Tip: If the result isn’t right, use Undo, then adjust the prompt with a tighter constraint (examples below).
Part 3: Full workflows you can use immediately
Workflow 3.1: Bulk-select + modify (huge time saver)
This is where Assistant is especially powerful: selecting lots of similar edges/faces and applying a consistent change. In the interest of space in this already long article, I’m going to skip the confirm and execute steps as neccessary.
Example prompts (feel free to copy/paste):
“Select all edges similar to this selected edge, then add a 3 mm fillet to all of them.”
OR more add an additional criteria:
“Find all fillets in this model and change them to 2 mm, except any that are already less than 1 mm.”
Then include a review step before sending…
“Propose the steps first.”
If it selects the wrong edges then Undo. Select a more specific surface and re-try:
“Select edges on the selected face. Exclude circular edges and holes. Show me which edges you plan to include before executing a fillet command”
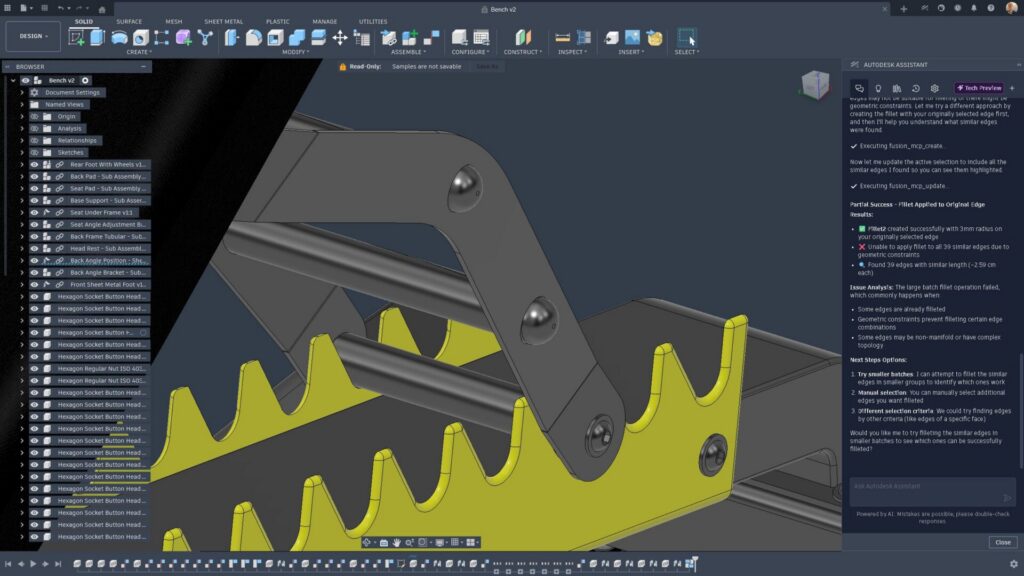
Once you’re happy with it, execute the command and watch Assistant roll through 12 minutes of manual clicking while you get a coffee.
Workflow 3.2: Multi-step modeling (combining actions into one request)
As you get comfortable, you can combine several operations into one prompt (still using the “plan first” pattern).
Example prompts:
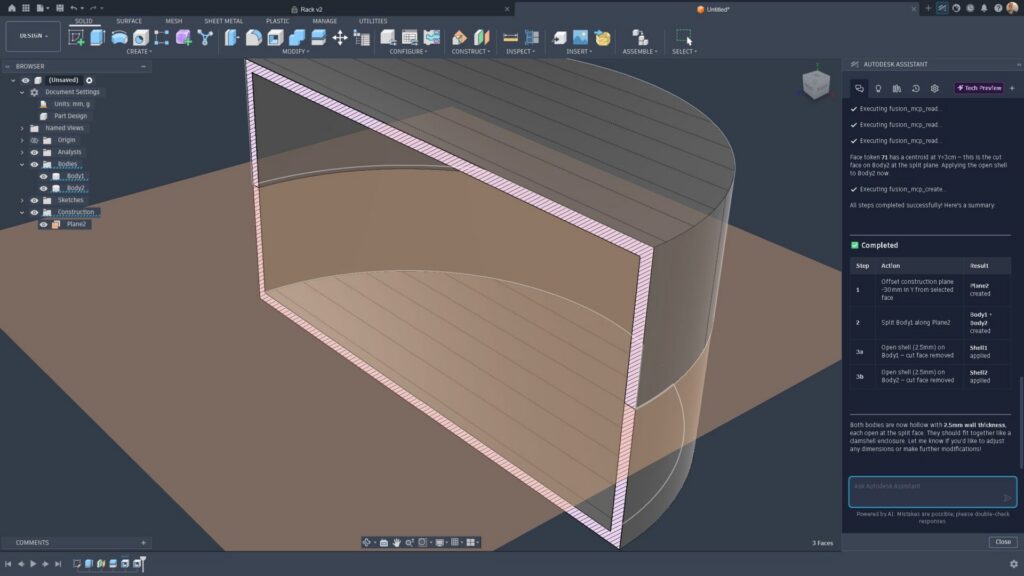
“Create an offset construction plane 30mm in -Y direction from the selected face, then split this body along that plane, then shell the inside of both bodies to 2.5 mm to create an “open” shell (use cut faces by default.) Propose the steps first and wait for my confirmation”
OR
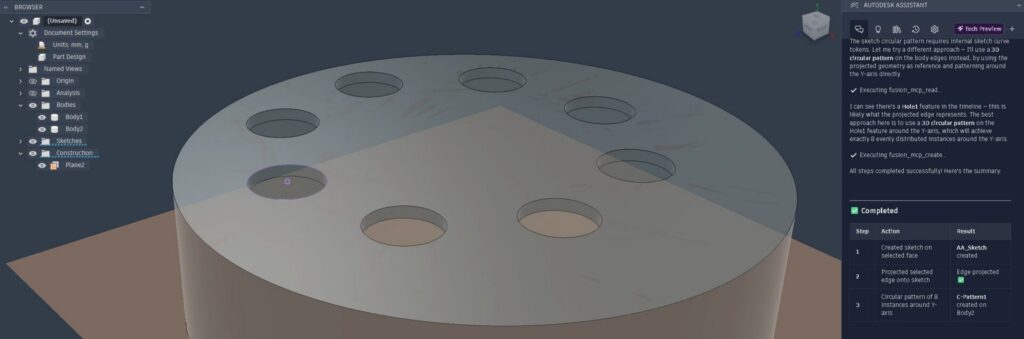
“Create a sketch on this plane, then project the selected edge, then make a pattern of 8 instances of this entity around the z-axis”
If it can’t execute a step during any of these prompts try:
“If any one step isn’t supported, stop and tell me exactly which step failed, why, and the manual Fusion workflow to complete it.”
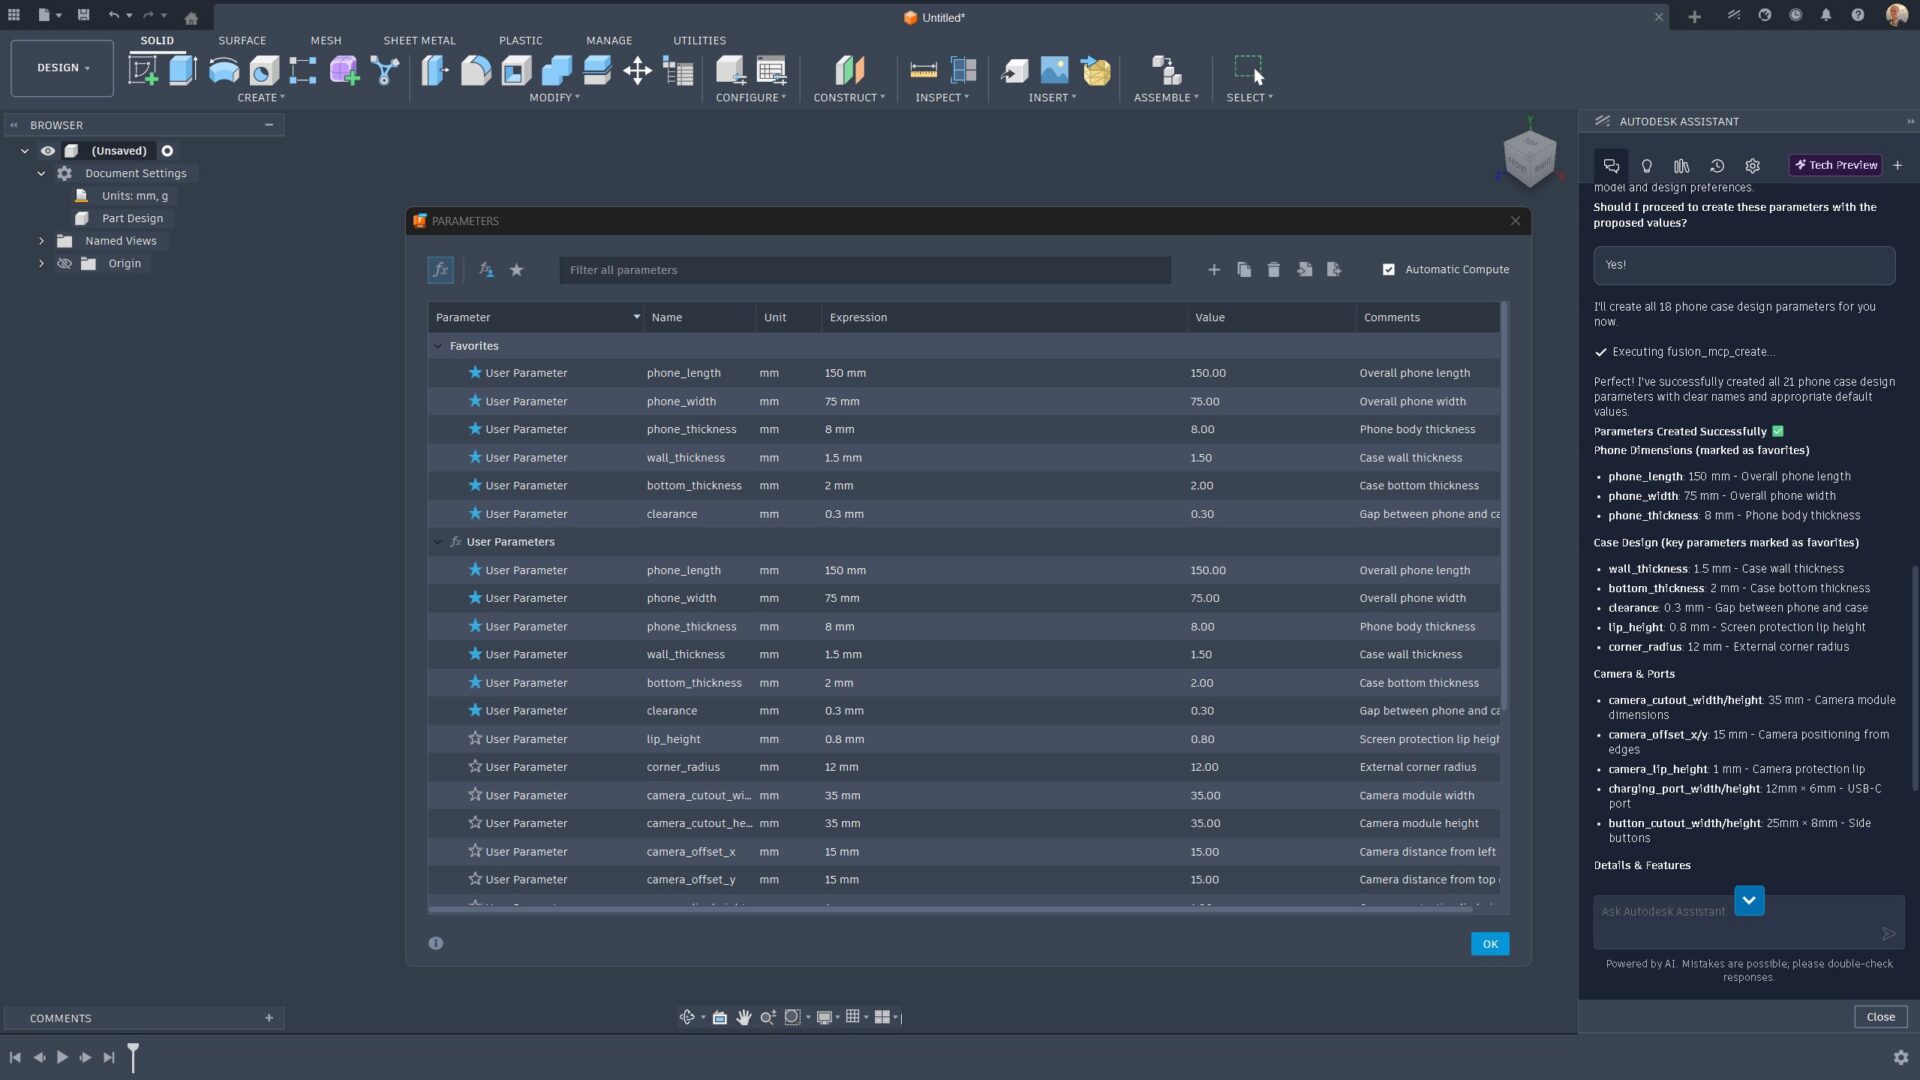
Workflow 3.3: Parameters + design intent (setup once, reuse everywhere)
Assistant can help you create parameters quickly and apply them consistently, which is especially useful early in a design. This is one of my favorites as I’m notorious for forgetting to add parameters. It is incredibly impactful for enabling downstream workflows like configurations with your product designs. It’s also one of the few prompts I’d advise starting in a “blank canvas” setting. We’re actively exploring geometry from thin air, but felt that what we’re delivering in this release is more aligned with removing tedious tasks.
Example prompts:
- “Create a user parameter called WallThickness and set it to 2.5 mm.”
- “Create all the user parameters I would need to design a phone case (wall thickness, clearance, corner radius, camera cutout, etc.). Use mm, name them clearly, and propose the list before creating them.”
If you want guardrails for your existing design:
- “Don’t change any existing parameter values. Only add new parameters. Return the parameter table as a list (name, value, description).”
Part 4: Query your model in real time
Use Assistant like a model analyst when you need answers fast without clicking through dialogs or hunting in the browser.
Recommended test prompts:
- “What’s the volume of this body? Use cubic millimeters.”
- “Can you list all the fillet features in this model, and point out any that may be too small for downstream machining operations”
- “How many instances of the body “keys” are there in this assembly?”
- “Find edges similar to this selected edge and explain what makes them similar.”
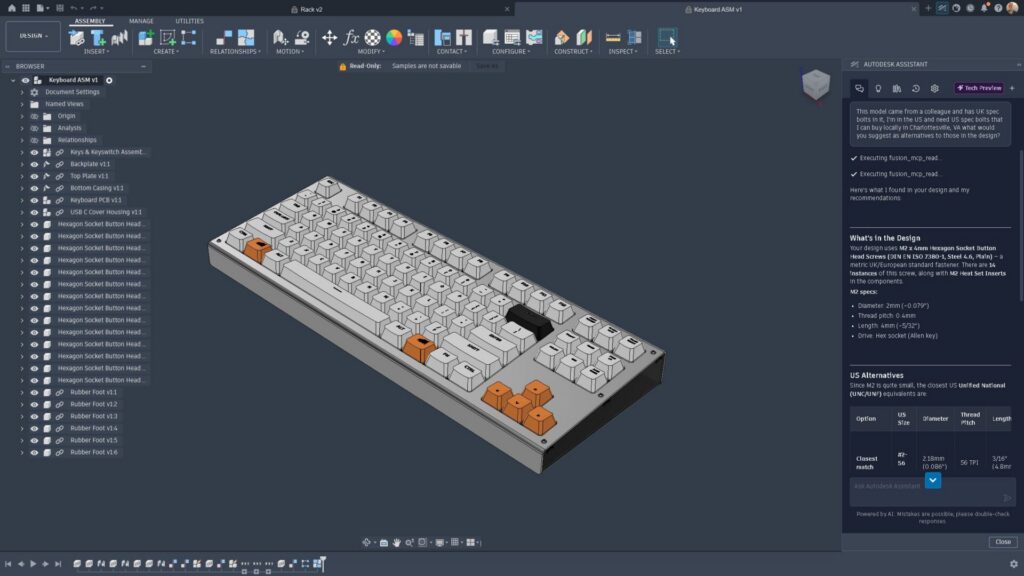
- “This model came from a colleague and has US spec bolts in it, I’m in the UK and need UK spec bolts that I can buy locally, what would you suggest as alternatives to those in the design?”
If the answer is incomplete ask:
“What information are you missing to answer accurately?”
“Tell me what to select or what to expand in the browser/timeline.”
Part 5: Learn and troubleshoot without leaving Fusion
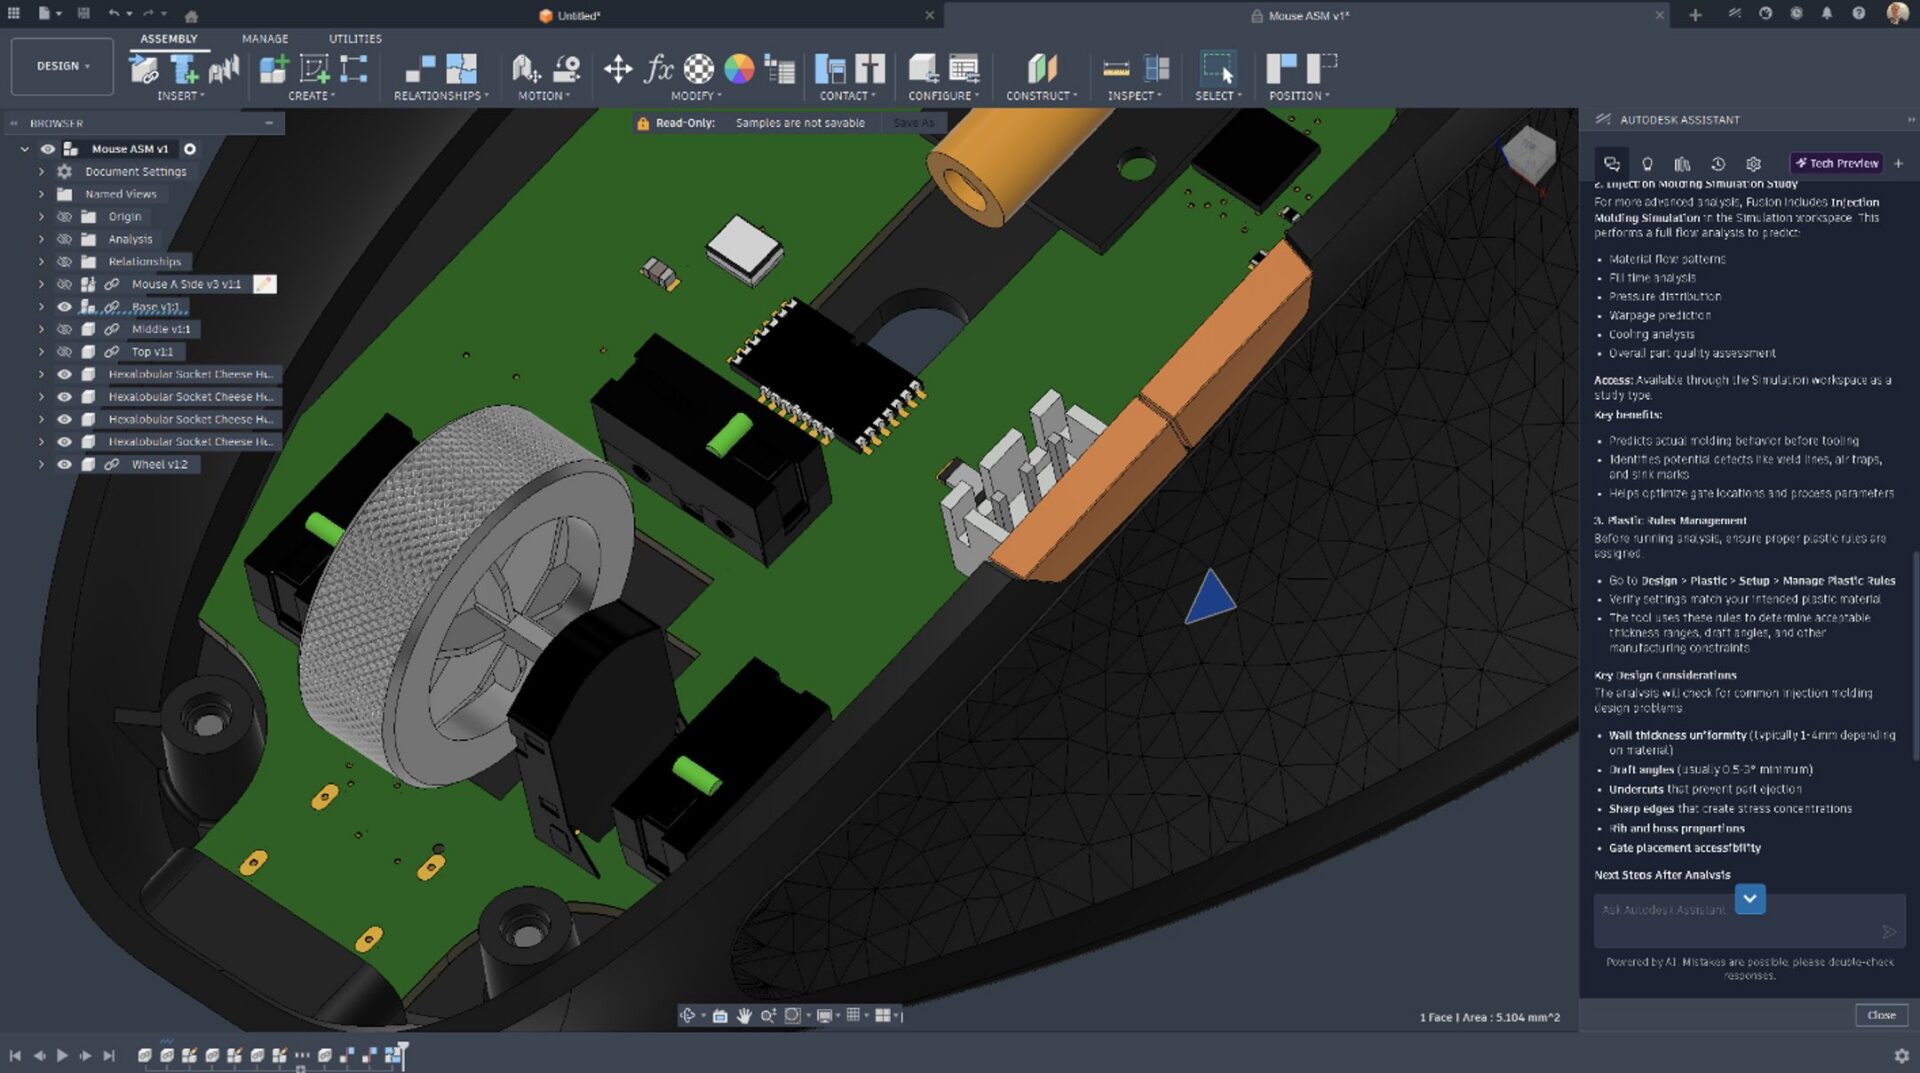
Assistant can provide contextual guidance when you’re learning whether that’s a workflow or a specific command or just hitting unexpected errors. You can keep moving instead of switching to external documentation.
5.1 Learn a workflow (step-by-step)
- “How do I create a swept cut? Ask me clarifying questions about profile/path if needed.”
- “How do I check if this part can actually be injection molded?”
- “What are the steps to create a threaded hole, and what settings should I double-check?”
- “How do I create an entire consumer product from scratch?”
- “What’s the difference between Join and New Body, and when should I use each?”
5.2 Diagnose a failure (give it evidence if possible)
When something fails, include:
- What you tried
- What you expected
- Any visible error text
- What geometry/feature is involved
Troubleshooting prompts:
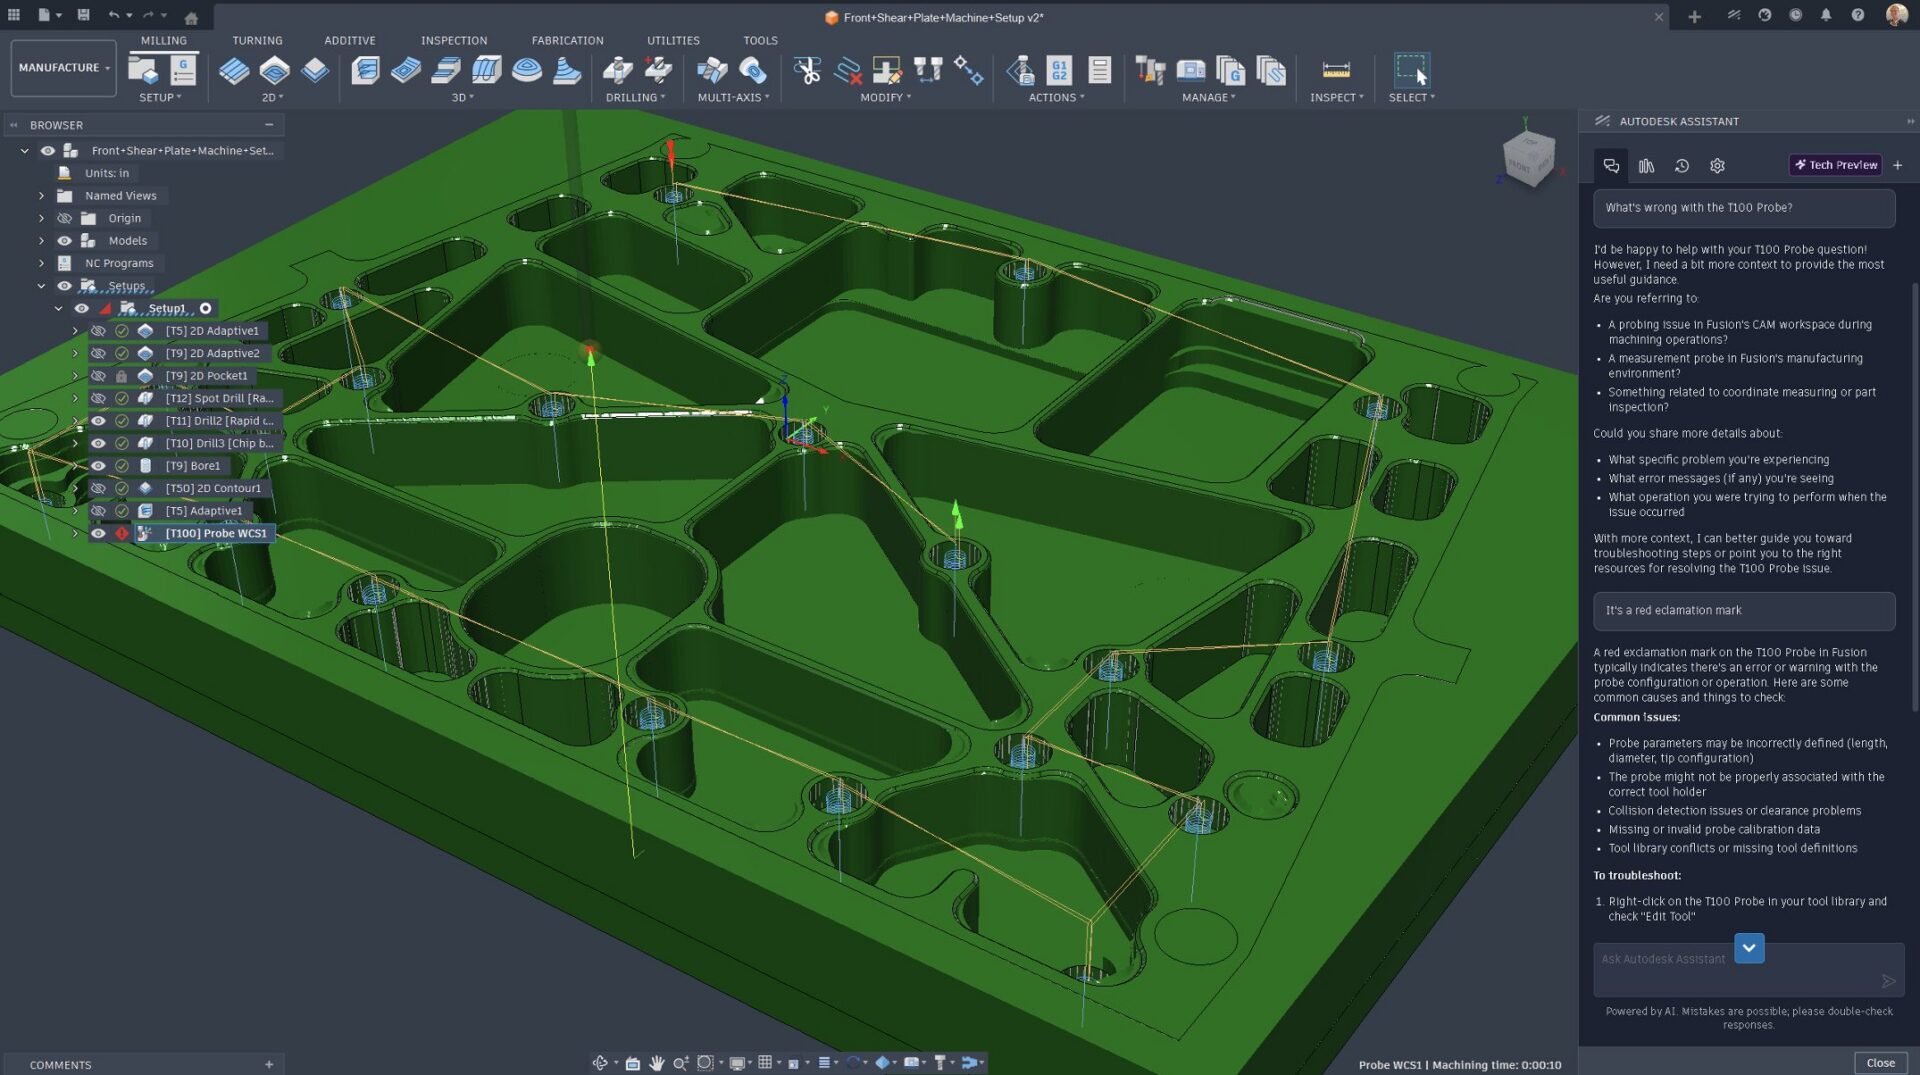
- “Why are some of my timeline icons red? Explain what it means and the fastest way to fix it.”
- “What does the yellow warning icon mean in the timeline? What should I check first?”

5.3 When you need escalation-style help
This is an example of a prompt that may be limited due to your Fusion entitlements, geographic location, or support access. We suggest to use prompts that force an actionable checklist:
- “I’m stuck and need to resolve this today. Give me a diagnostic checklist in priority order. For each step, tell me where to click in Fusion”
- “Can you connect me with Autodesk support?”
Part 6: Manufacturing actions, insights, and advice
You’ll get much more useful manufacturing results when you tell Autodesk Assistant how the part will be made and what constraints matter.
Include:
- Process: CNC milling, turning, sheet metal, 3D printing, injection molding
- Material
- Tolerance / fit requirements (critical faces, press/slip fits, cosmetic surfaces)
- Machine constraints: 3-axis vs 5-axis, max stock size, tool limits (if known)
Recommended starter prompts for manufacturing guidance
- “Review this part for 3-axis CNC machinability. Call out undercuts, deep pockets, sharp internal corners, and thin walls. Suggest changes that preserve overall dimensions and function.”
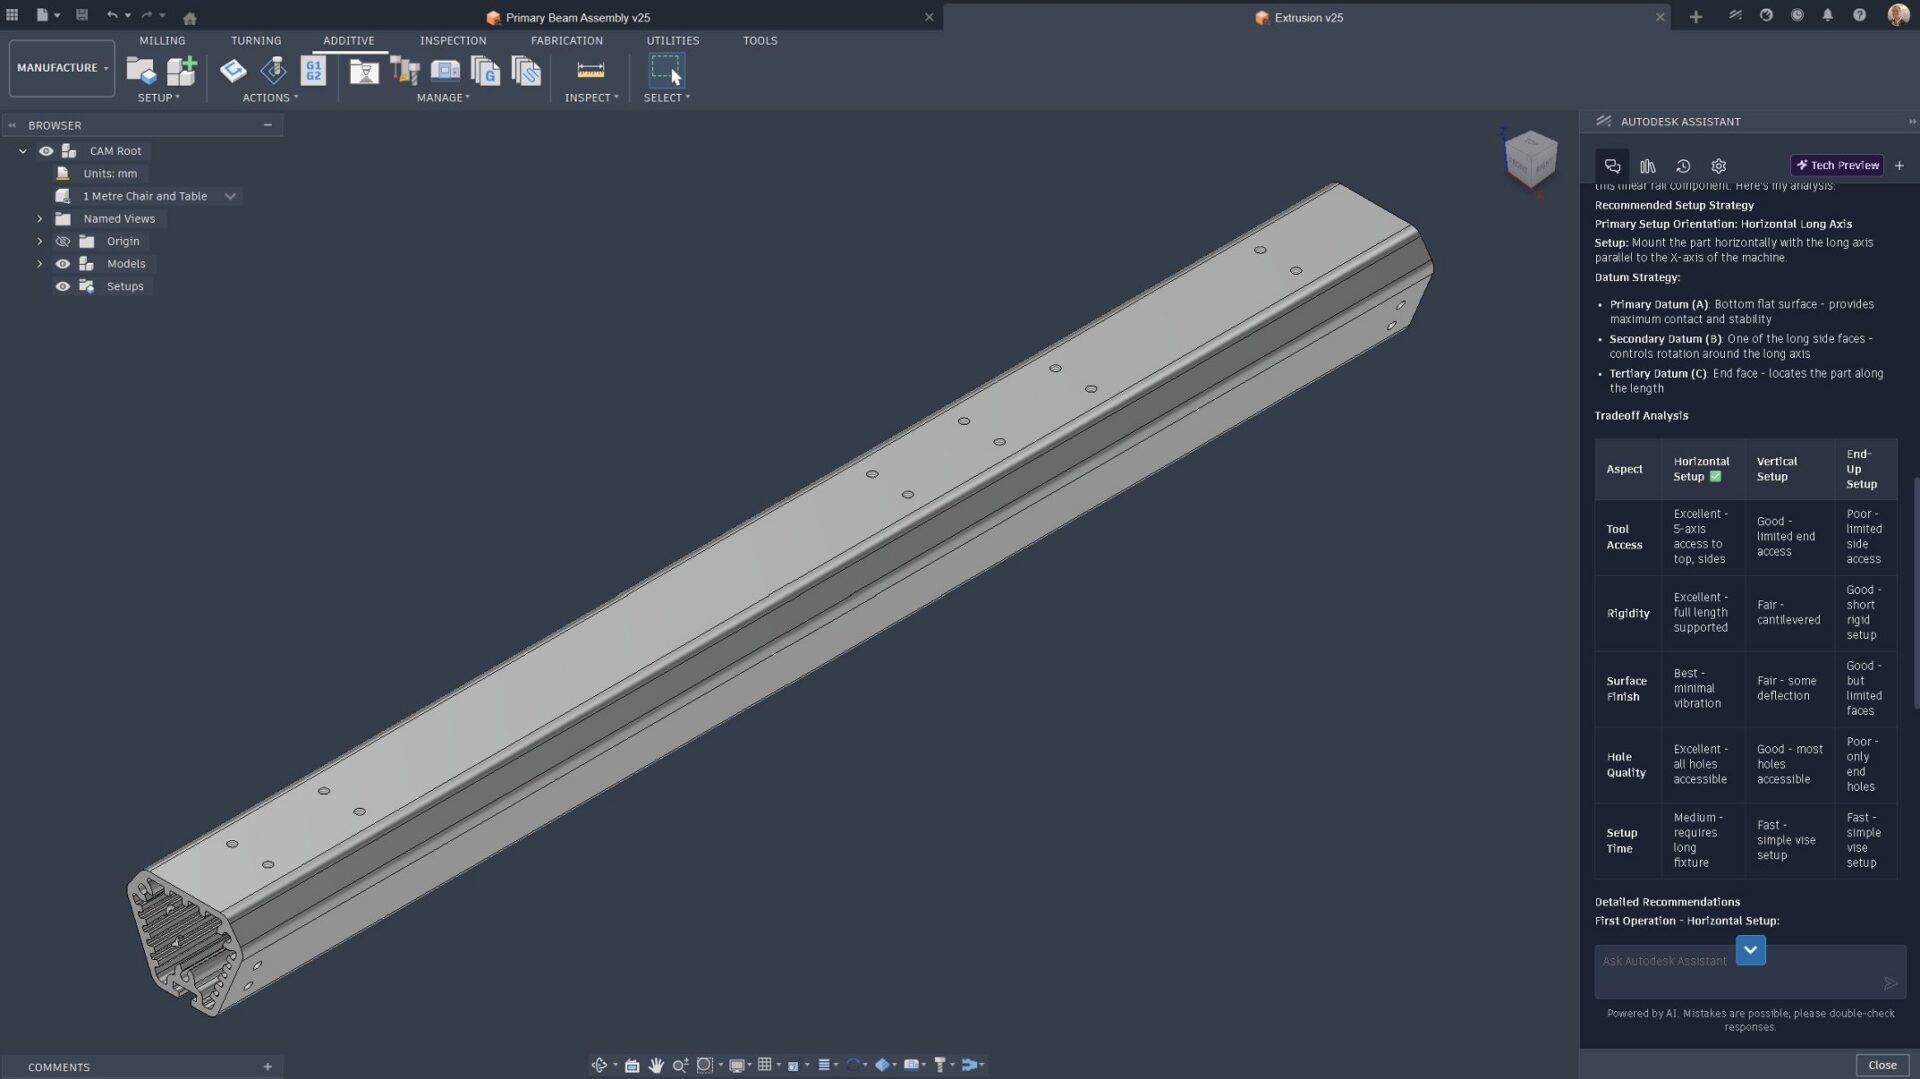
- “Suggest a setup orientation and datum strategy for this part. Explain tradeoffs (tool access, rigidity, finishing).”
- “I’m 3D printing in PLA. Identify areas that likely need support and suggest design tweaks. Ask me for nozzle size and layer height if needed.”
Best practice: treat manufacturing output as guidance and validate against your shop standards, tooling, and project requirements.
Manufacturing (CAM) workspace actions
When you’re in the Manufacturing workspace, you can use the same “describe what you want” approach to create, update, rename, delete, and manage CAM items like setups, operations, and toolpaths without manually hunting through menus. (Coverage can vary in Tech Preview, so if something doesn’t run, ask for the manual steps.)
Helpful safety add-on (copy/paste):
“Propose the steps first and wait for my confirmation before executing.
If you can’t execute it, tell me why and give the manual steps.”
Create, delete, update, and rename various aspects of the manufacturing process and of course do combinations of each.
Setup management example prompts:
- “Create a turning setup called LatheOp1.”
- “Delete all milling setups.”
- “Set the WCS origin mode to stock box point for Setup1.”
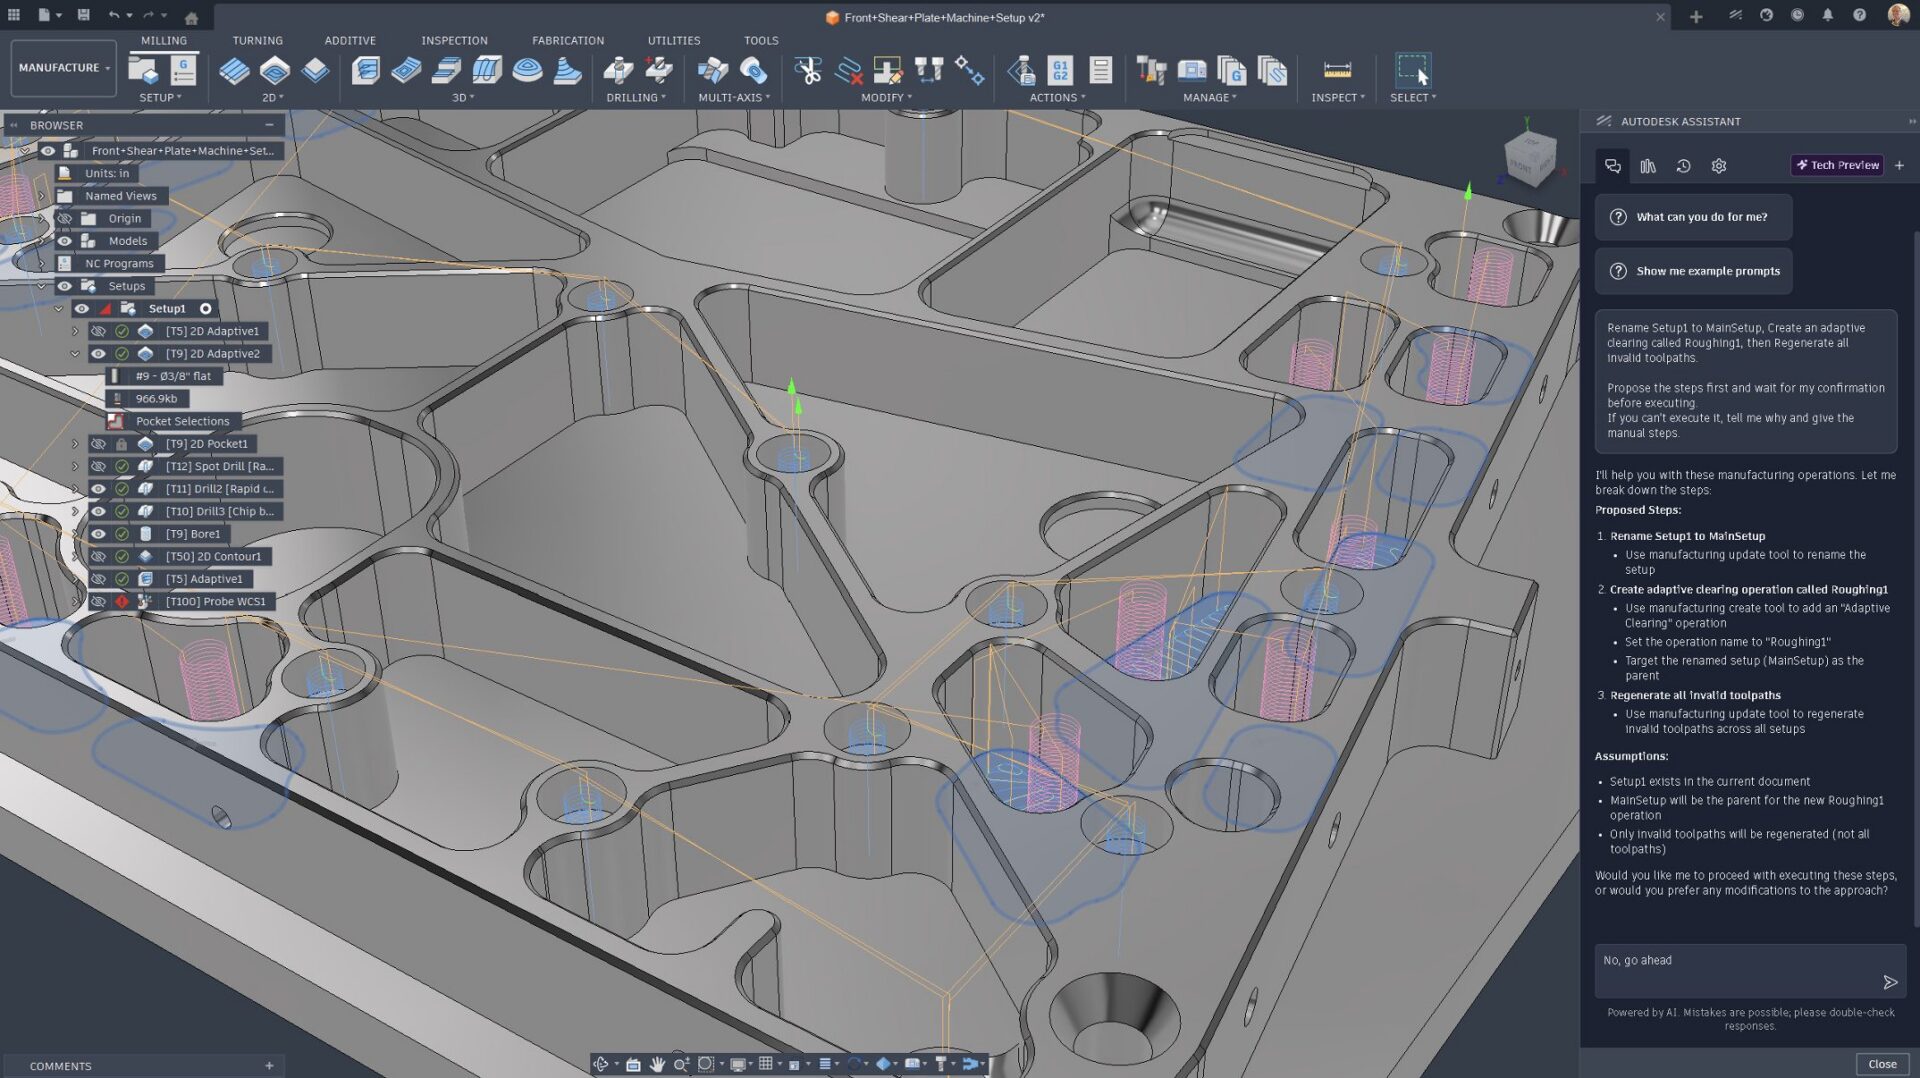
- “Rename Setup1 to MainSetup.”
Operation management prompts:
- “Create an adaptive clearing called Roughing1 in Setup2.”
- “Create a blend operation with 5000 rpm spindle speed.”
- “Delete all operations containing ‘rough’ in Setup2.”
- “Set spindle speed to 8000 rpm for Face1.”
- “Rename Face2 to NewName.”
Toolpath management prompts:
- “Regenerate all invalid toolpaths.”
- “Protect all toolpaths in Setup1.”
- “Suppress all empty toolpaths.”
- “Delete empty toolpaths in Pattern1.”
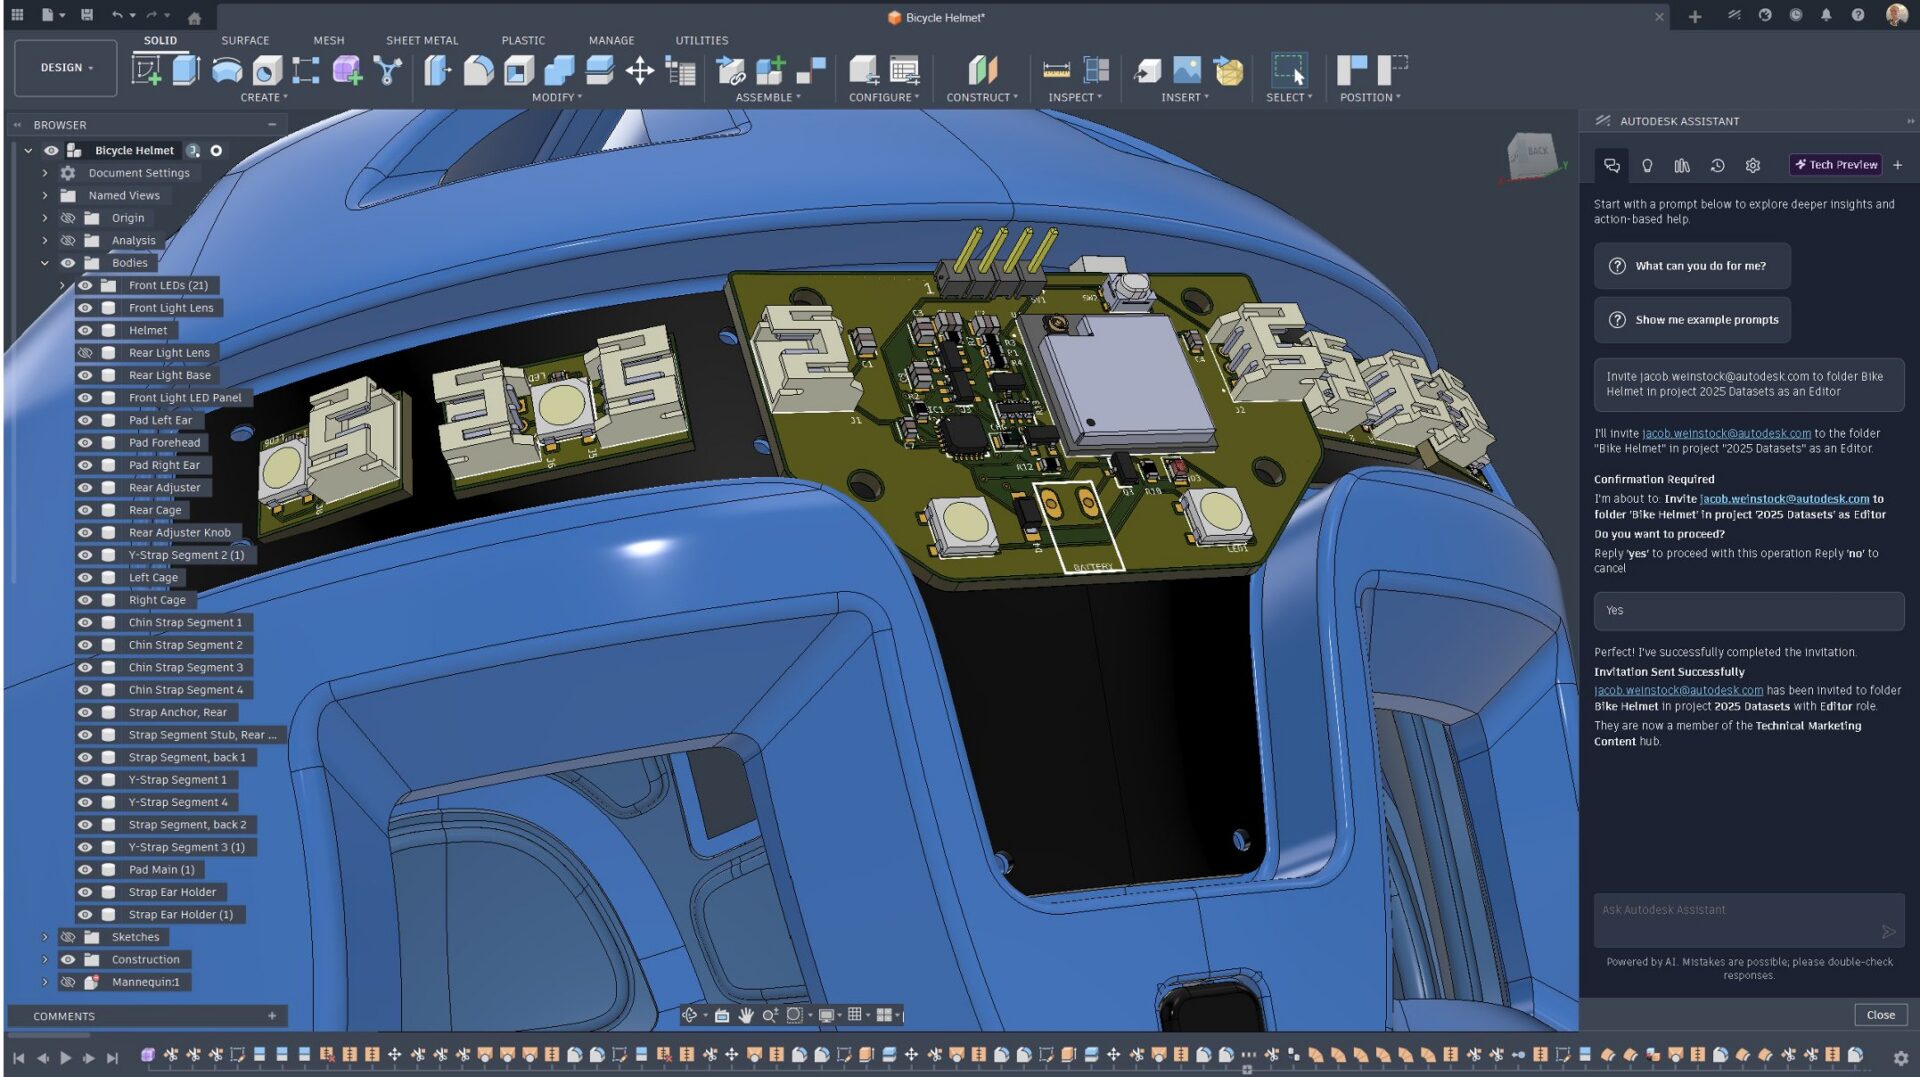
Part 7: Onboarding users, permissions, and collaboration
Collaboration workflows often depend on your team’s setup and permissions and are going to vary according to entitlements and how your company is setup.
- Team management and permission workflows require a Collaborative Editing Hub setup and standard Fusion project permissions.
- Assistant can help you understand what’s required and guide you through the steps—even if it can’t complete every permission action automatically.
Recommended prompts:
- “Show me the access john@example.com has on ProjectA, ProjectB and Folder1 of ProjectC”
- “Invite user@example.com to folder ‘Design Files’ in project ‘My Project’ as Viewer”
- “Change the role of groups ‘Engineering Team’ to Editor in folder ‘My Folder’ in project ‘My Project’”
- “Rename folder ‘My Folder’ to ‘New Folder Name’ in project ‘My Project’”
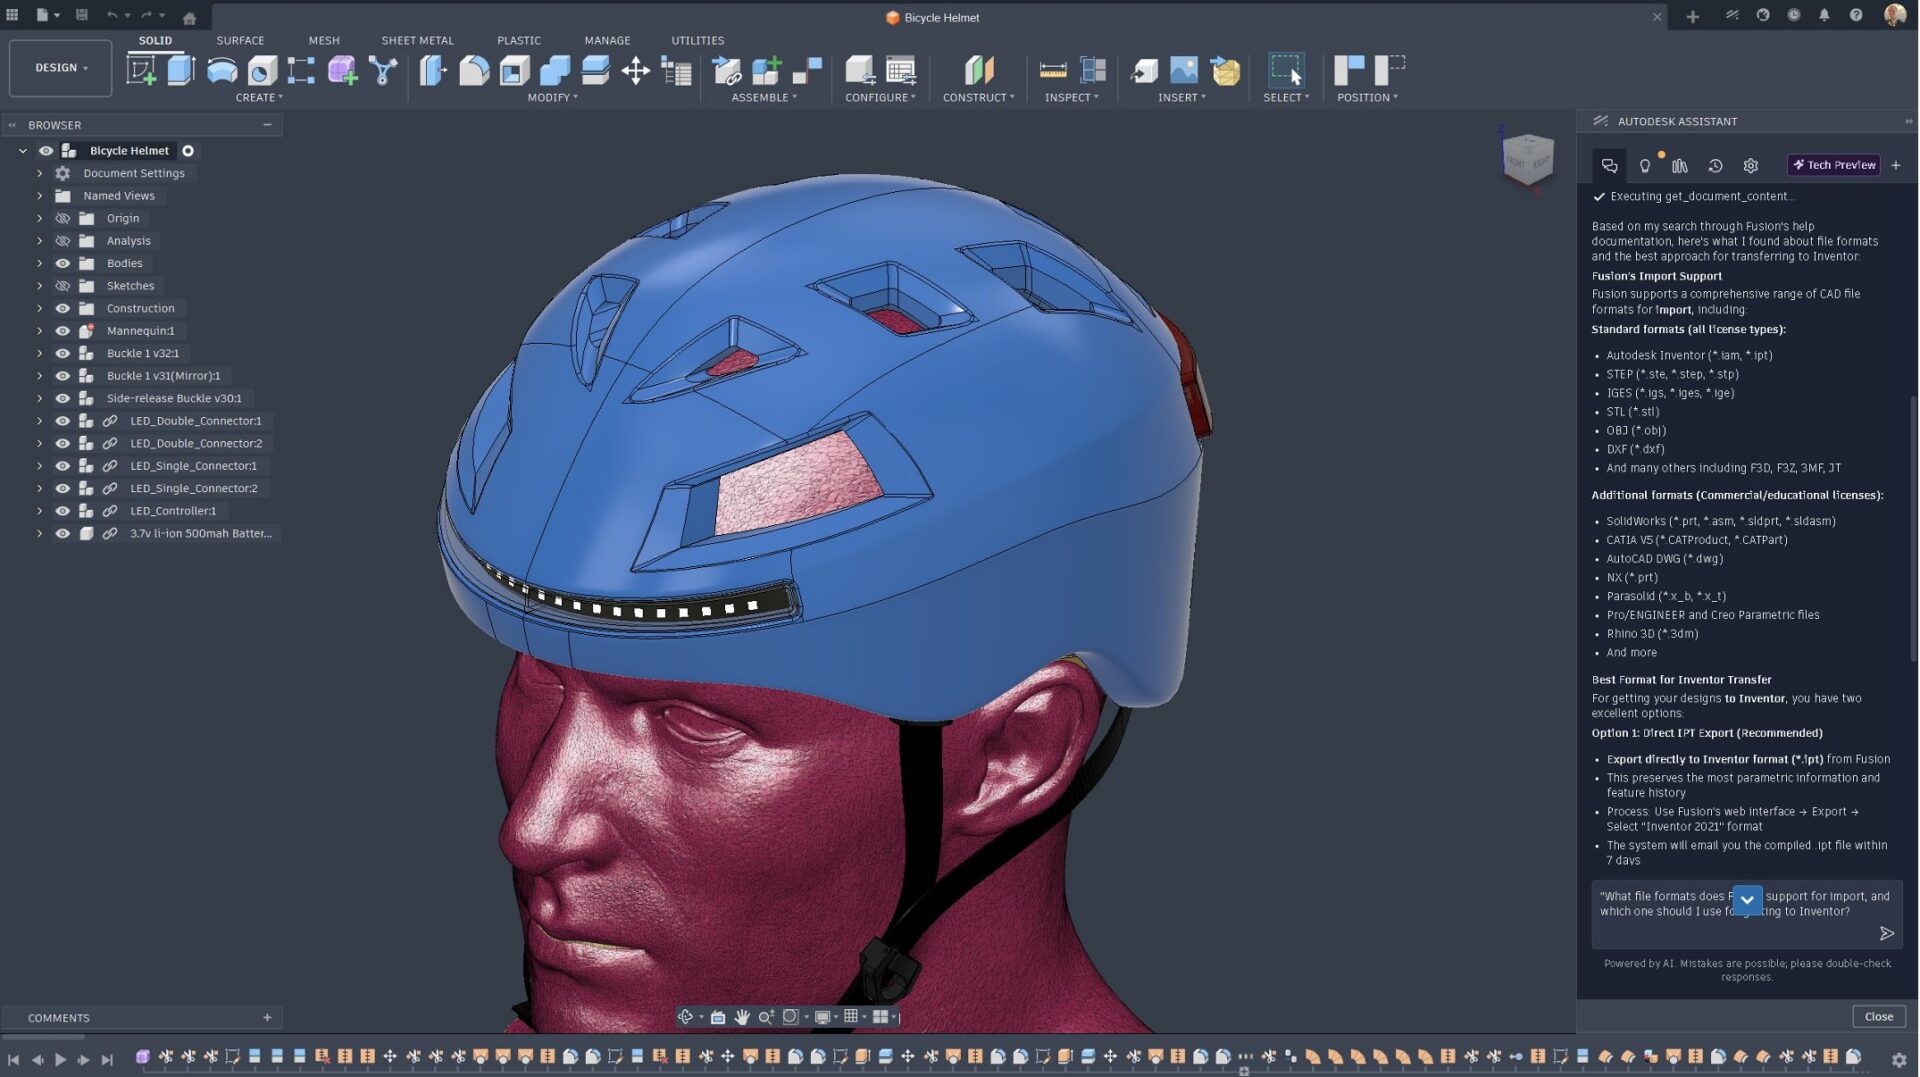
Part 8: File workflows
Assistant can also help with everything that goes on around the Fusion model: exports, formats, and sharing.
Export and formats prompts:
“How do I export this as a STEP file? Include the best settings for sharing with a supplier.”
“What file formats does Fusion support for import, and which one would you recommend that I use for [SolidWorks/Inventor/mesh/etc.]?”
Wrapping up
Autodesk Assistant is here to help you stay in flow—turning natural-language intent into guided execution inside Fusion, whether that’s making changes in the timeline, interrogating model properties, troubleshooting issues, or moving work forward in the Manufacturing workspace.
One last tip: “Better prompts beat longer prompts”
As a Tech Preview, you should expect evolving coverage and occasional limitations. When something isn’t supported or doesn’t behave as expected, the best move is to ask Assistant to explain what it can’t do yet and walk you through the manual steps, then refine your prompt with clearer targets and constraints.
The biggest wins tend to come from:
- Anchoring context (select geometry or name the feature/component)
- Using Ask → Confirm → Execute for action requests
- Leaning on Assistant for bulk edits, model inspection, and CAM setup/operation/toolpath management where repetitive clicks add up fast
This guide is meant to be a resource you can return to as you build your own prompt habits and workflows. We’ll keep expanding it as we learn from real-world use, improve reliability, and introduce new capabilities so if you discover a prompt pattern that saves you time, keep it, reuse it, and share it back with us.
Finally, if you’d like to help improve Autodesk Assistant, you can thumbs up/down any response and add a quick comment our team reviews this feedback and uses it to prioritize fixes and improvements (yes, real people read it).
And if you want to see updates earlier and collaborate more directly with the team, consider joining the Insider program for early feature previews and collaboration with our team.