Unlock smarter additive workflows in Fusion with new arrangement criteria.
In additive manufacturing, how parts are arranged within a build volume directly affects print time, part quality, and overall efficiency. This process—often called nesting—can be complex, especially when balancing competing goals like density, speed, and thermal stability.
For the Fusion April release, we have introduced some new controls over how components are orientated and arranged.
Introducing Arrangement Criteria
We have added an Arrangement Criteria table in the Solver tab. This enhancement allows you to define exactly which arrangement criteria should influence the nesting result—and just as importantly, to set their order of priority using the arrows at the bottom of the table.
Each selected criterion contributes to how each component is oriented during the arrangement process. The solver evaluates the enabled criteria in priority order, selecting orientations from the allowed rotations defined in the Objects tab. This is done during the arrangement of each component at a time until all components have been arranged.
Note:
- Arrangement criteria is only apply when Rotation is enabled
- Available exclusively for True Shape arrangement methods
What does each arrangement criterion do?
Balance Z Layers
Selects an orientation from the allowable orientations users enabled to minimize variation in cross sectional area for that component. This is important as large cross-sectional area variations can introduce thermal instability during printing, leading to warping, residual stress, and distortion.
Selecting this option gives the following benefits:
- More consistent thermal distribution
- Improved part quality
- Reduced risk of print failure
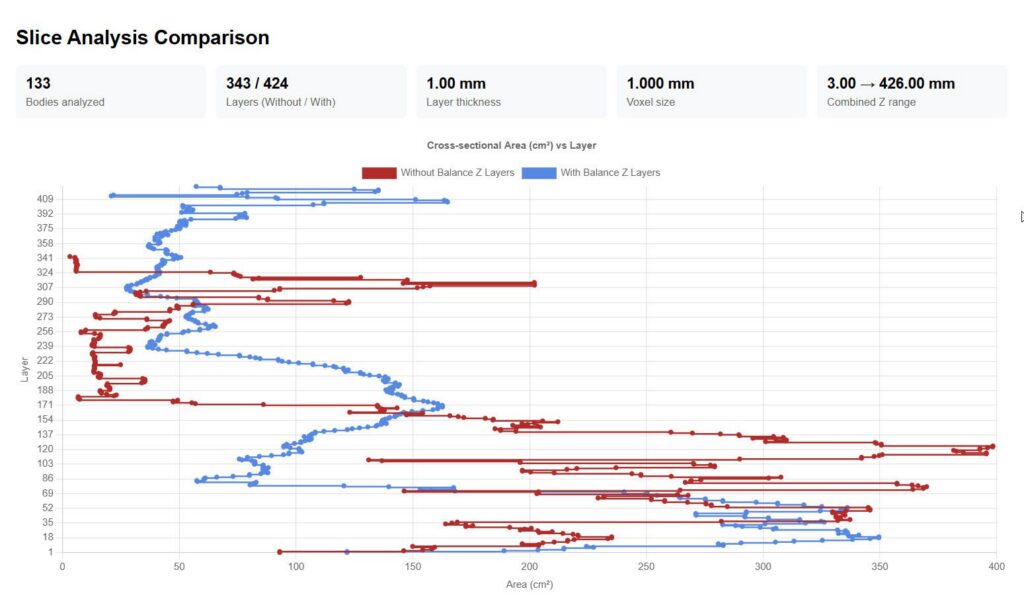
Above, we can see how the Balance Z Layers option reduces variation in layer area by orienting and arranging components to achieve more consistent cross-sections, minimizing extremes and lowering the standard deviation between layers. This typically results in increased build height and reduced arrangement density.
Minimize Build Height
Reduces overall build height, helping to shorten print time and improve arrangement density.
Maximize Bounding Box Overlap
Aligns each component at a time to increase overlap between bounding boxes, resulting in a better arrangement density.
Minimize Build Volume
Reduces total occupied volume, improving overall arrangement density.
Maximize Contact Area
Arranges each component in a way that maximizes the contact area between its voxels and the placed components. This contributes to denser arrangements.
Minimize Component Bounding Box
Reduces the bounding box of a component during arrangement, enabling more efficient arrangements.
Minimize Component Height
Reduces the Z height of a component during arrangement, helping improve arrangement densities.
These arrangement criteria give you direct control over how components are oriented and arranged—whether optimizing for speed, density, or quality. They improve transparency while enabling greater control and more reliable outcomes.