Slot creation in Inventor simplifies mechanical design with built-in tools, offering straight and curved slot options, constraints application, and best practices to enhance workflow, precision, and project quality.
As mechanical designers and engineers, we’re always looking for ways to speed up the design process. One effective method is using the built-in slots in Inventor.
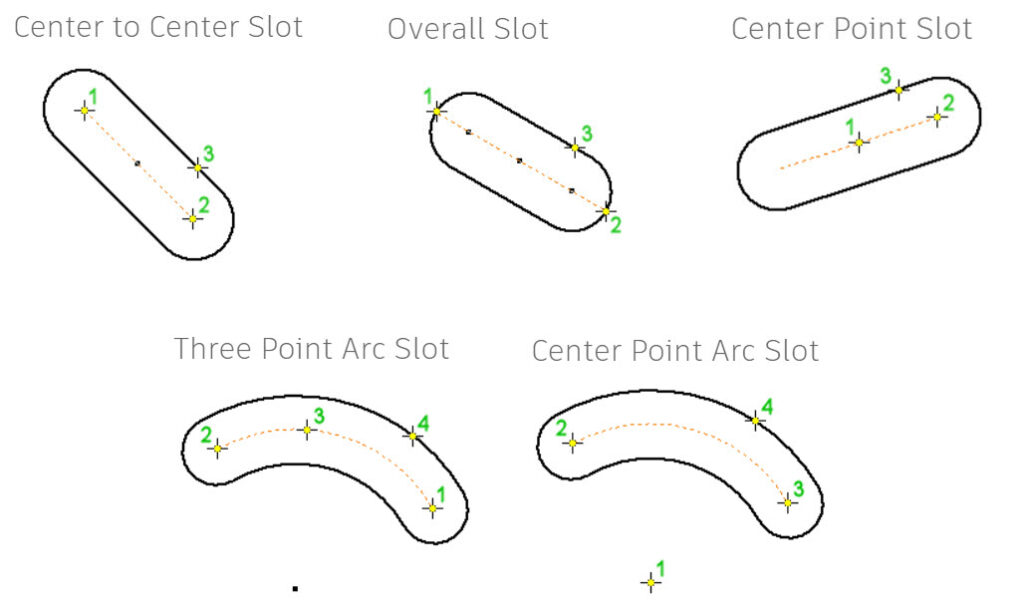
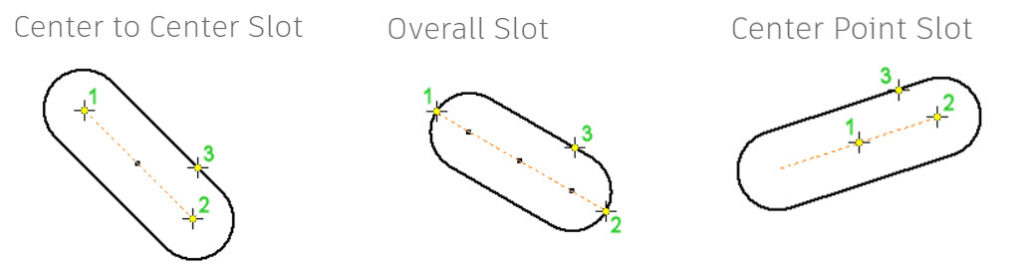
Creating slots in a 2D sketch is easy with Autodesk Inventor, offering five different options to create any slot you need in just a few clicks. For straight slots, you can choose from center to center, overall, or center point slots. Below is a quick example of the necessary points to define each type. Selecting the correct hole or mounting hole is crucial for precise positioning and alignment when creating slots in assemblies.
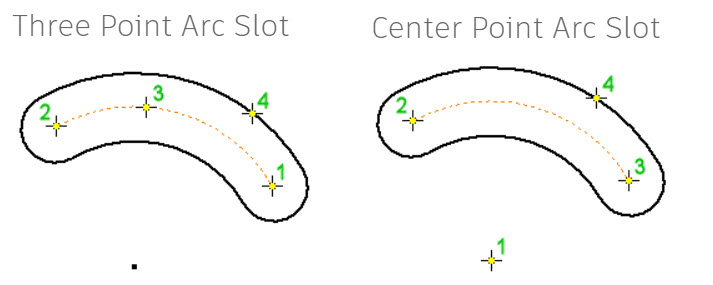
You can also effortlessly create curved slots using either the 3 point arc or center point arc slot tool. These options require just one additional point to define the entire slot.
Introduction to slots in Inventor
A key feature of Autodesk Inventor is the ability to create slots, which are integral to mechanical design and assembly. Whether you’re designing for manufacturing or prototyping, mastering slot creation can significantly improve your workflow and project quality.
Understanding the fundamentals of Autodesk Inventor, including applying constraints and using the slot feature, is essential for creating reliable and robust designs.
In this guide, we’ll explain how to create slots, apply constraints, and share best practices to enhance your engineering proficiency.
Understanding design fundamentals
Before creating slots, it’s vital to grasp the design basics within Autodesk Inventor. Start by comprehending how to connect different components, as this forms the basis of any assembly. Accurate distance measurements and using the center point as a reference will help you achieve symmetric and precise designs.
Component location is crucial, and applying constraints can fortify your model by ensuring everything stays in place as planned. Autodesk Inventor’s slot feature simplifies the process—just select the slot tool, define your center point, and choose from the available options to create the slot that best suits your needs. For your security, please complete the verification process to confirm you are human before proceeding with these steps.
How to create slots in an Inventor sketch
Autodesk Inventor provides five distinct ways to create slots in a sketch, offering flexibility to meet your design requirements.
- Straight slots: For straight slots, you can choose from Center to Center, Overall, or Center Point slot types, each requiring specific points for accurate placement.
- Curved slots: For curved slots, the 3 Point Arc and Center Point Arc tools enable you to create complex shapes by specifying additional points.
By understanding these options, you can select the most efficient method for your project, saving precious time.
Applying constraints in Autodesk Inventor
Applying constraints is essential for creating functional and realistic assemblies in Autodesk Inventor. Constraints control the movement and interaction of components, ensuring your design behaves as intended. Use the joint command to define connections between parts, and leverage the measure tool to set precise limits for motion and alignment. By applying constraints, you can enhance your design’s accuracy and reliability. To further personalize your experience, Autodesk Inventor uses cookies to remember your preferences and settings. Please accept the use of cookies to continue optimizing your workflow and making the most of the available features.
Best practices for creating slots in Inventor
Follow these proven tips and tricks to achieve the best results when creating slots in Autodesk Inventor. Start by defining the center point of your slot to maintain symmetry and precision. Use the measure tool to set exact dimensions and ensure your slot fits perfectly within your design. Establish a strong connection between components using the joint command, which aids in controlling movement and ensuring proper alignment. Before finalizing your design, review all details and verify that everything is complete and correct. These best practices will enhance your experience and help you create high-quality, reliable models.