How is data stored in Fusion?
Autodesk Fusion combines CAD, CAM, CAE, and PCB into a single, integrated cloud software platform. Fusion combines fast and easy organic modeling with precise solid modeling, so you can go from design to manufacturing, seamlessly. At a high level, Fusion provides one shared place for you and your team to manage data as a single source of truth, providing visibility of your data, relationships between data, granular permission control, custom group management, and more.
At its core is the Fusion hub; a place in the cloud where you and your team store and manage, not only Fusion data, but any other documents and files that may be relevant to the successful completion and implementation of a project.
What is Desktop Connector?
Desktop Connector gives you a virtual Fusion drive on your Windows desktop so you can easily store files in your Fusion projects and access them from anywhere. Because development projects often involve data from other sources, such as specification sheets, user manuals, and other CAD systems including Autodesk Inventor and SolidWorks, Desktop Connector provides that seamless bridge between your computer and the cloud, making it easy to manage all data within Fusion.
While it is possible to upload CAD data to Fusion through other means, only Desktop Connector uploads non-Fusion CAD data while keeping the files in their native file format and all references intact. This means you can:
- Manage your data in a Fusion hub in the cloud and still work with it in its native CAD system.
- Use our AnyCAD technology to bring non-Fusion designs into a Fusion design when a project involves different CAD systems.
- Use Fusion’s other capabilities for CAM, analysis, simulations, generative design, eCAD, and other studies on non-Fusion data, again using AnyCAD.
This guide provides the key steps and recommendations you should follow to enable you to work with Inventor and SolidWorks data in a Fusion hub using Desktop Connector.
Best practices to get started
Before you can use Desktop Connector with Fusion, you must complete these steps in this order:
Be a member of a Fusion hub and be granted Editor permissions to at least one project.
- If you are the Fusion hub administrator, be sure to follow Get started for administrators for proper hub setup. You’ll need to make sure you invite the rest of your team to the hub and grant project permissions where relevant so they can also collaborate in your hub.
- Read through the Get Started in Fusion help to familiarize yourself further with Fusion.
Read through these helpful resources to better understand Desktop Connector capabilities.
1. Upload a design
Once you have Desktop Connector installed, you are ready to bring data into Fusion. It’s as simple as copying and pasting data into the correct project folder in the Fusion drive on your computer! By using Desktop Connector’s Upload with References feature, non-Fusion CAD files and design references remain intact, meaning your assemblies can be opened in their native CAD system while being stored inside a Fusion hub. This also means that you can be confident that no files are left behind once uploaded into Fusion. This is why we always recommend using Desktop Connector to upload CAD data into Fusion. See Upload with References for more information on this capability.
1.1 Considerations & Recommendations
- Resolve any missing references before uploading your data. This will make the whole process easier as Desktop Connector will be able to find all files from the start. This also means your team can work with the uploaded data straight away without having to worry about missing data.
- Store all contents of a design in Fusion. In other words, avoid distributing data across both cloud and local storage. While this workflow is feasible, it can cause an inconsistent experience for collaborators.
- Upload assemblies individually. This is because Desktop Connector is not meant to be used as a bulk migration tool, and you may run into issues if you give it too much at once to upload. You can upload files that are a maximum of 6 GB.
- Drawings are not automatically uploaded when uploading models. Therefore, you’ll have to make sure you select them to be uploaded separately or at the same time as its model.
- Files with references found outside the main folder structure are organized into a Related Data folder in Fusion. As a result, you should make sure to give the necessary permissions to this folder to anyone who needs access to this design later. Alternatively, you can always move files to different locations once in Fusion.
- Files with names greater than 255 characters cannot be uploaded. This is due to Microsoft’s file path length limit of 260 characters for files and 247 characters for folders. If Desktop Connector detects files and folders with names greater than this limit, it presents you with an error message indicating which files and folders it cannot upload.
1.1.1 Considerations & recommendations when uploading Inventor data
- To enable you and your team to manage Inventor data in a Fusion hub, you should follow the guidance outlined in this help page.
- Inventor uses project files (.IPJ) to store the paths to folders where your design data is located. To help Desktop Connector ensure you upload assemblies and include all references, you’ll want to make sure you select the correct project file for each upload that spans the locations of your data.
- Content Center parts are created when you choose specific parts from the Place from Content Center part dialog. These parts are then created and saved in the Content Center folder you specify in the IPJ file. When working in Fusion, you should specify the Content Center directory to be one inside a dedicated Fusion project.
- Use relative paths in the .IPJ settings for Workspace, Libraries, and Content Center Files. This is so that references are maintained if you change the main project location in Fusion.
1.1.2 Considerations & recommendations when uploading SolidWorks data
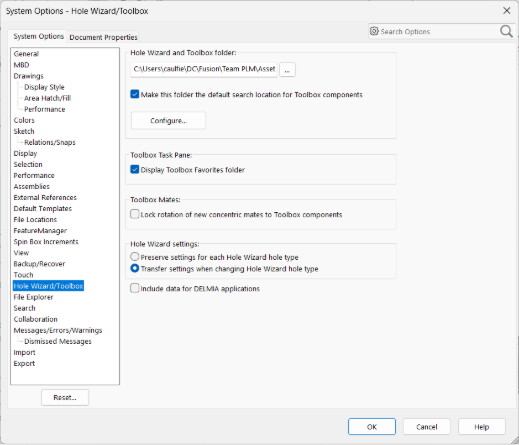
- When working with a team of designers, it is often recommended to install the toolbox library in a shared location. When you use Fusion, you can install the toolbox library in Fusion in a dedicated project that everyone can access. You should then make sure everyone in your team configures their toolbox library to point to its location in Fusion.
1.1.3 Further resources
2. Design with Fusion
Once your data is in Fusion, you now have it managed in a centralized controlled space where everyone can access the most up-to-date version of a design. You should ensure that your team is aware that the data is now managed in Fusion and should no longer be accessed from its original location.
At this point, how you work with the data is up to you; you can:
- Use our AnyCAD technology to open the CAD data in the Fusion desktop client for use there, or;
- Continue to open it in its native CAD system and save all changes to Fusion.
2.1 Design using AnyCAD
Fusion comes with built-in technology known as AnyCAD. AnyCAD acts as the bridge between a design created in non-Fusion CAD software and a Fusion design. Any changes that may be required to the non-Fusion CAD must still be done in its native CAD tool, but by storing that CAD data in a Fusion hub and using AnyCAD, designs in Fusion that use the non-CAD software can be updated instantly.
2.1.1 Key things to know
Now that your non-Fusion CAD data is in a Fusion hub, there are some important things to know about what happens to those files and what you can do with them now.
- The way you open a non-Fusion CAD file in Fusion is important as the method you choose will change what you can do once it’s open:
- Double-click the part/assembly from the Data Panel to open it in Fusion. This creates a Fusion design that references the native CAD file in it. You can see this in the Timeline. The design can be modified directly in Fusion and treated like a solid body but will also update if the original CAD file is updated outside of Fusion.
- Insert the non-Fusion part into a Fusion assembly. This again creates a reference to the original CAD file, is shown in the Timeline, and updates when the original CAD file is updated, but it cannot be modified in Fusion.
- Joints (ie. constraints, mates or the equivalent term in each CAD software) are not carried through when you open an assembly in Fusion. This is because there isn’t a one-to-one relationship between how other CAD systems constrain parts and how Fusion does it. As a result, when you open an assembly in Fusion using AnyCAD, the initial positions are correct, but the motion won’t be retained. You’ll need to recreate the joints in Fusion.
- Design history is not brought into Fusion. In other words, the history and order of sketches, extrudes, cuts, and so on are not shown in Fusion and therefore cannot be modified there.
- Drawings are not uploaded by default when uploading a design with Desktop Connector. Therefore, you can decide whether you want to upload them separately or recreate them in Fusion.
- If you want to upload drawings, you should include them when selecting their corresponding models using the Upload with References tool to upload both at the same time.
- Note that non-Fusion drawings cannot be opened in Fusion at all. They will have to be opened in their native CAD software.
- When importing assemblies that contain configurations and opening that assembly in Fusion, only the active configuration is brought into Fusion. Should you want to work with multiple configurations in Fusion, you would need to
- Set the first configuration active.
- Rename the original file to match the configuration.
- Import the assembly into Fusion.
- Set the next configuration active.
- Rename the original file to match the next configuration.
- Import the assembly into Fusion.
- Repeat for each configuration you want to work with in Fusion.
See Desktop Connector | Fusion – Manage Files and Folders for more information on working with cloud-based files in Fusion with Desktop Connector, including Fusion design files.
2.1.2 Further resources
2.2 Continue to design in native CAD system and sync changes to the Fusion hub
Since Fusion cannot modify non-Fusion CAD files directly, should any further design changes be required, you must do so in their native CAD systems. You may also decide that most of your design work will continue in Inventor or SolidWorks, and you’ll use Fusion for its other capabilities, such as electronics and manufacturing.
2.2.1 Considerations & Recommendations
- Before opening a CAD file from the Fusion drive on your computer, ensure that you have the latest version synchronized to your computer. Desktop Connector should automatically and frequently synchronize changes between your computer and the cloud.
- Discuss who will work on specific CAD files and when. It is possible for more than one person to have the same CAD file open on their local computer. However, if someone saves a new version to the cloud, Desktop Connector will automatically synchronize and override the outdated version any other computers.
2.2.2 When working with Inventor data
- You’ll need to configure an Inventor project file (.IPJ) file to point to the top-level of the Fusion project where Inventor data is stored in the Fusion drive on your computer. Setting this location to a lower level may result in unexpected results when opening and working with Inventor data.
- The .IPJ file cannot be configured to span more than one Fusion project. Therefore, you must create separate .IPJ files for each Fusion project in which you want to manage Inventor data.
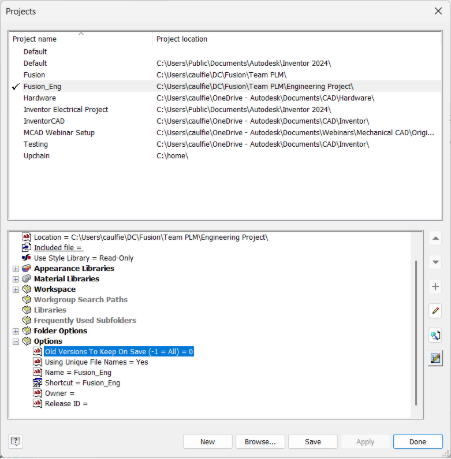
- In the .IPJ file, set the option Old Version To Keep On Save to 0. This means that Fusion automatically saves the history on each save. You can then access this file history from the Fusion web client.
- Note that Inventor can consume Fusion data using AnyCAD as well. See Inventor | To Import Fusion Files as an AnyCAD Reference Model for more information.
2.2.3 When working with SolidWorks data
In general, when you upload a SolidWorks assembly, references to its parts should be automatically updated to their new location in the Fusion hub. However, if you ever encounter any issues, you may need to adjust the Search Routine so that it includes the Fusion drive on your computer.
3. Collaborate in Fusion
Now that your data is in Fusion, your non-CAD users can also be involved in reviewing and collaborating on designs using the Fusion web client.
The Fusion web client comes with a 3D viewer with capabilities to manipulate the view of the model or drawing, measure, create markups, and add comments. You can view the versioning history of each file with descriptions, and mark new versions so you can keep your team informed of important changes. This is a great way to get feedback from your stakeholders and customers.
Each design and drawing also has the ability to have a conversation of comments so that many team members can be involved in its lifecycle. Furthermore, by storing your data in Fusion, you benefit from all of Fusion’s user and group management capabilities. You can manage user and group permissions for projects, folders, and subfolders. This means you have control over who is involved in each project.
3.1.1 Further resources
4. Final recommendations
As you can see, Desktop Connector grants you and your team the ability to bring multiple CAD systems together in one centralized location in the cloud.
You should set up company standards. When everyone is collaborating from one centralized location, it is important that everyone follows the same processes and has the same settings and configurations on their computers so that data is consistent.
To ensure a successful implementation, be sure to consider the recommendations as outlined in the previous sections as well as all linked resources.