Uploading project files sounds simple. Open a folder, move the files, and you are done.
Civil infrastructure projects rarely work that way.
Most projects include XREFs, DREFs, XML files, templates, source drawings, and other linked data. If files are uploaded without those relationships, something important can break.
Autodesk Forma gives you a few different ways to upload project data. Each one works best in a specific situation. The key is knowing which method to use before you start.
1. Drag and drop for quick file uploads
If you just need to upload a single file, drag and drop is the fastest option.
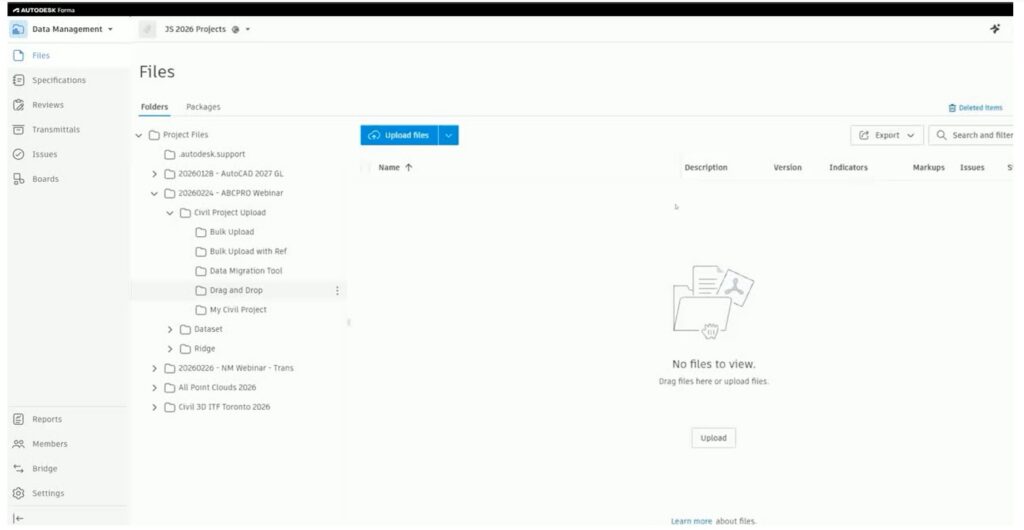
Open Forma Data Management in the browser, then drag a file from Windows Explorer into the correct folder.
This works well for quick, one-off uploads. For example, sharing a file for review or adding a document to a project.
There are a few limits to keep in mind. This method works at the file level only. It does not bring reference files with it. Dragging a full folder into Forma would also result in an error. If you are looking to add folders and its contents you would want to use Desktop Connector.
If references are not part of the workflow, this method keeps things simple.If you just need to upload a single file, drag and drop is the fastest option.
Open Forma Data Management in the browser, then drag a file from Windows Explorer into the correct folder.
This works well for quick, one-off uploads. For example, sharing a file for review or adding a document to a project.
There are a few limits to keep in mind. This method works at the file level only. It does not bring reference files with it. Dragging a full folder into Forma would also result in an error. If you are looking to add folders and its contents you would want to use Desktop Connector.
If references are not part of the workflow, this method keeps things simple.
2. Use Desktop Connector when references matter
When you are working with actual project data, references usually matter.
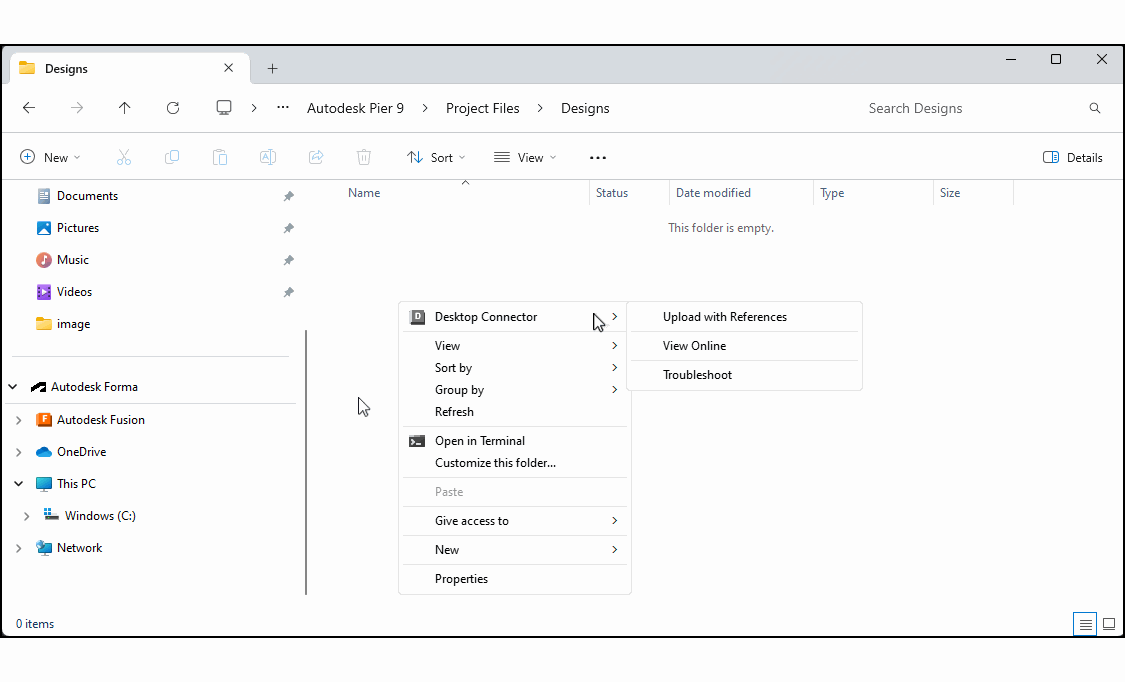
Desktop Connector includes an Upload with References option. You select your local project folder, choose a destination in Forma, and let the tool scan the project before uploading.
That scan is where this workflow becomes useful. It highlights missing or broken references before anything is uploaded. You can then resolve those issues by pointing to the correct XREFs, DREFs, XML files, templates, or source drawings.
Once everything is resolved, the upload continues with those relationships intact.
This approach helps avoid a common problem where files upload successfully but do not behave correctly afterward.
It is also worth noting that naming standards set up in Forma Data Management are reflected in the local Forma Data Management drive through Desktop Connector. Files uploaded through either the browser or the local drive follow the naming rules for that folder.
While Desktop Connector is a good fit for active project work, it is not intended to handle large scale bulk migrations.
3. Bulk upload when references are not critical
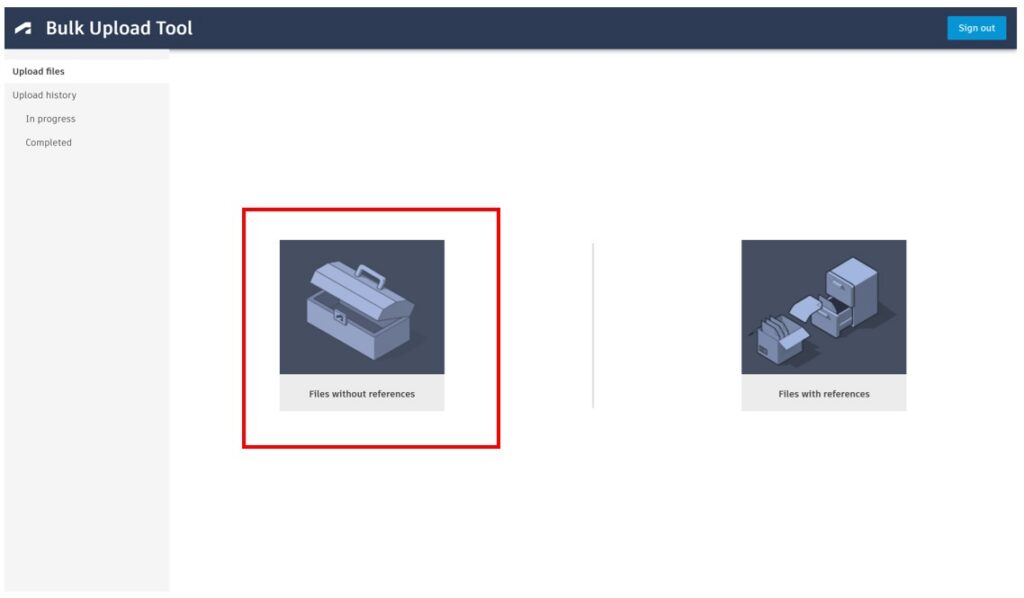
If you need to upload a large number of files and references are not required, the Bulk Upload Tool may be a better fit.
Select Files without References, choose your local source folder and target Forma folder, run validation, and upload.
This method skips reference checking entirely. It simply moves files from one location to another.
Because of that, it can be faster, especially for larger uploads. It is a practical choice for standalone files or datasets that do not rely on linked content.
The Bulk Upload Tool is available through the Forma Data Management help page.
4. Bulk upload with references for full project moves
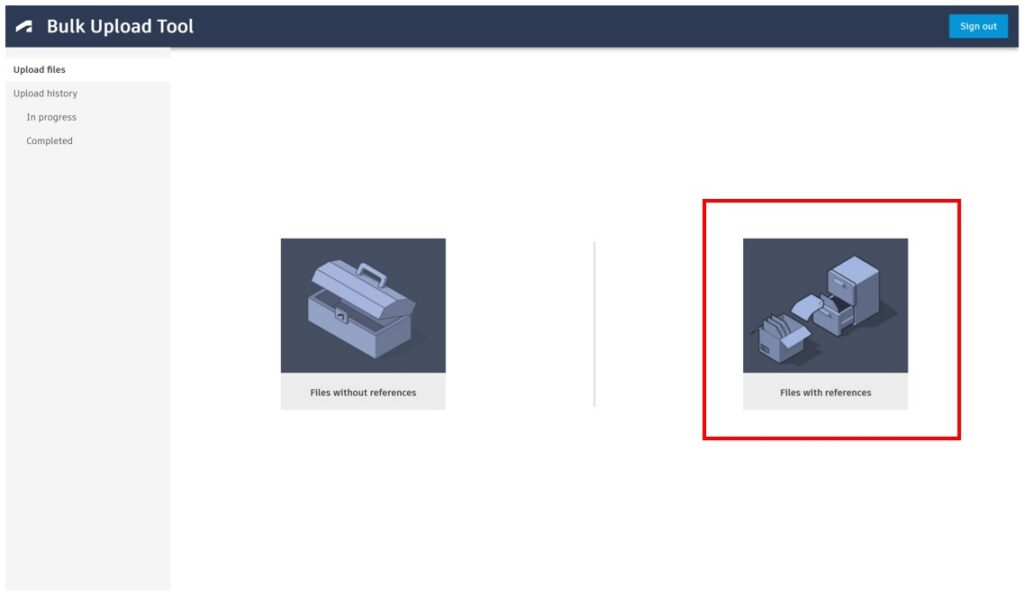
For larger uploads where references need to be preserved, there is one additional step.
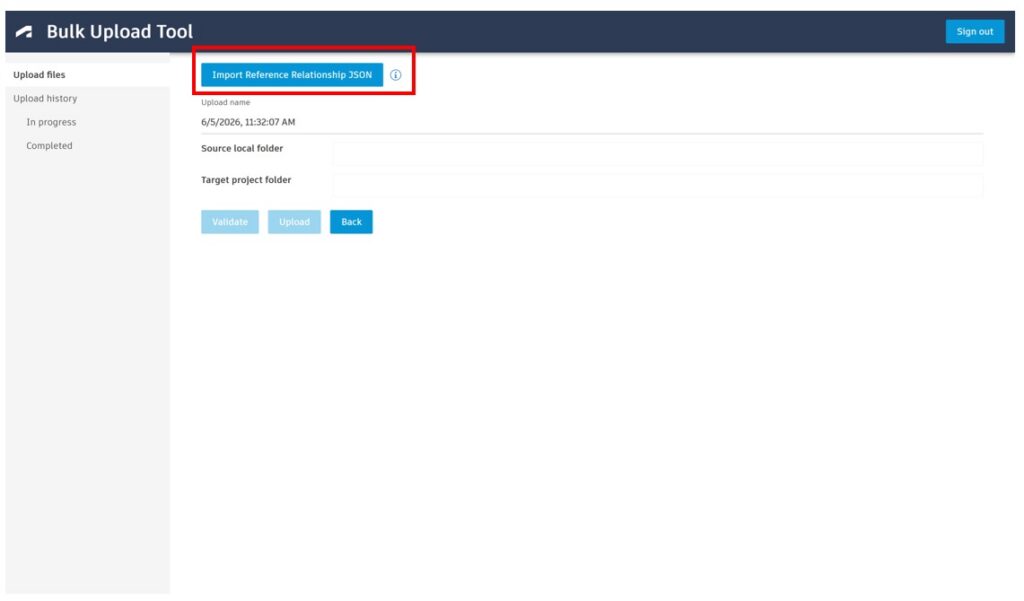
You need a Reference Relationship JSON file.
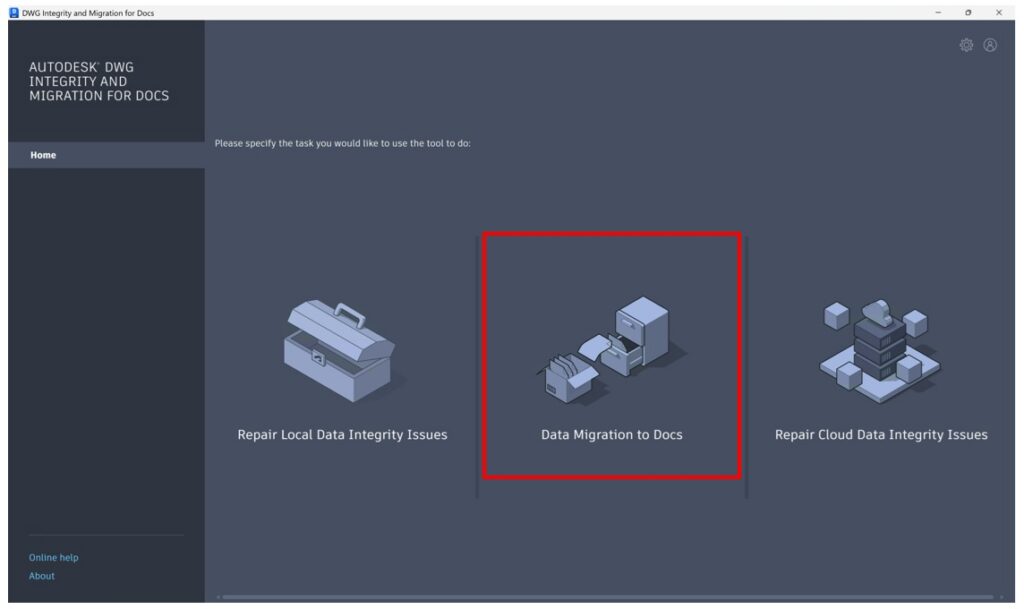
You can create this file using the Drawing Integrity & Migration Tool for Forma Data Management. The tool scans your project, checks for missing references, and flags long path issues.
If missing references are found, you resolve them directly in the tool by selecting the correct folders. Long path issues are identified as informational items so you can review them as needed.
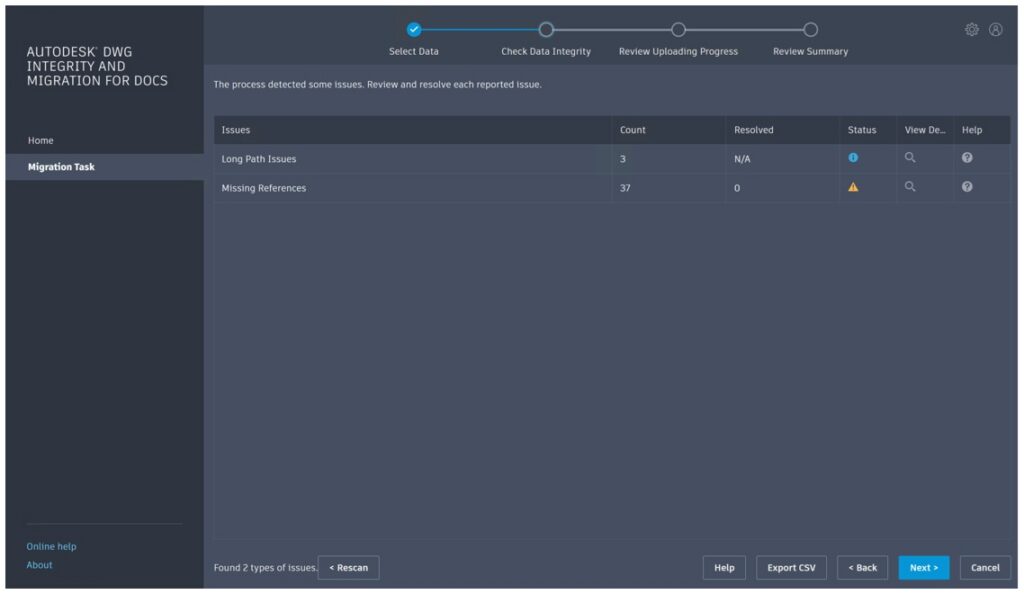
Once the project is cleaned up, export the Reference Relationship JSON file. A CSV report can also be exported if you need a record of the scan.
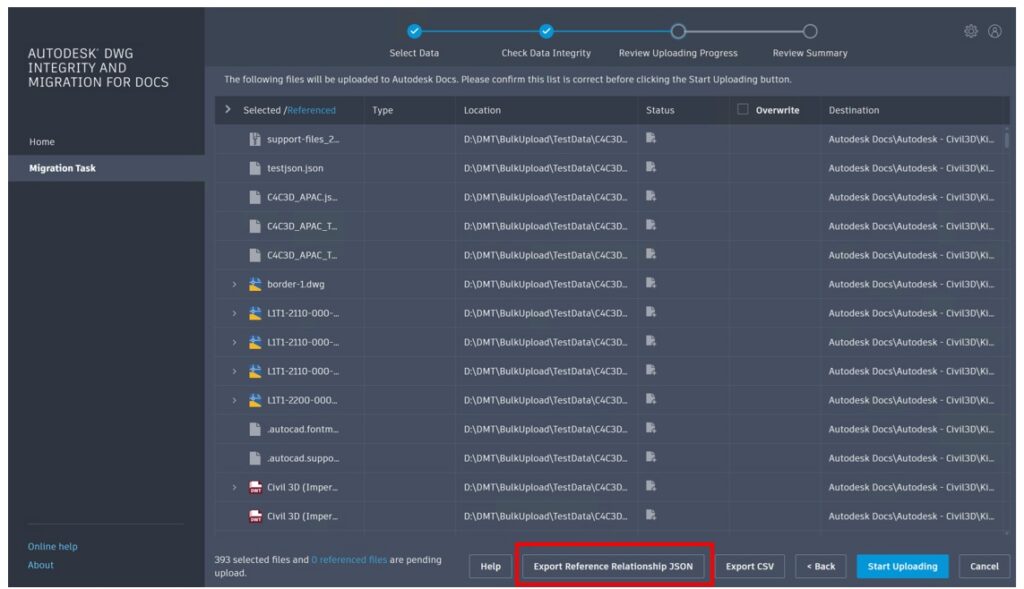
Next, open the Bulk Upload Tool and select Files with References. Import the JSON file, run validation, and upload.
The Bulk Upload Tool uses the JSON file to map local files to their destination in Forma and preserve reference relationships during upload.
While you can also upload directly from the Drawing Integrity & Migration Tool by selecting Upload, this option is better suited for smaller uploads. For large projects, we recommend using the Bulk Upload Tool because uploads from the Drawing Integrity & Migration Tool run through Desktop Connector, which is not intended for large migrations.
One important caution: do not upload the same files from the Drawing Integrity & Migration Tool and the Bulk Upload Tool at the same time. This can create overwrite conflicts.
Naming standards
Naming standards configured in Forma Data Management are applied automatically. Files uploaded through the browser or Desktop Connector follow the rules defined for that folder.
Use caution when turning on naming standards for folders that already contain referenced files, such as data shortcuts. The naming standards workflow does not exclude files that should not be renamed. If data shortcuts are automatically renamed, links could break.
If your workflows rely on data shortcuts, you will need Forma Design Collaboration. Forma Data Management alone does not include this capability.
Choosing the right method
Each method solves a different problem.
- Use drag and drop for quick, single file uploads
- Use Desktop Connector when references need to be maintained
- Use bulk upload without references for speed and simplicity
- Use bulk upload with a JSON file for larger, reference aware migrations
A small decision at the start can prevent a lot of clean up later.
Start with the reference question
Uploading files is more than a setup step. It determines whether your data stays connected and usable once it is in Forma.
Start by asking a simple question. Do the references need to stay intact?
If they do, choose a method that preserves them. If they do not, use the fastest path available.
That balance is what keeps projects moving without rework.
Plan your move to the cloud with more confidence
See how Autodesk experts walk through civil cloud workflows, including Desktop Connector, upload best practices, reference management, and troubleshooting tools that help maintain project health. Watch the webinar.